Accept Apple Pay™
This guide will walk you through the process of accepting Apple Pay™ in your website or iOS app, while leveraging Basis Theory platform to perform all necessary operations in PCI-sensitive data.
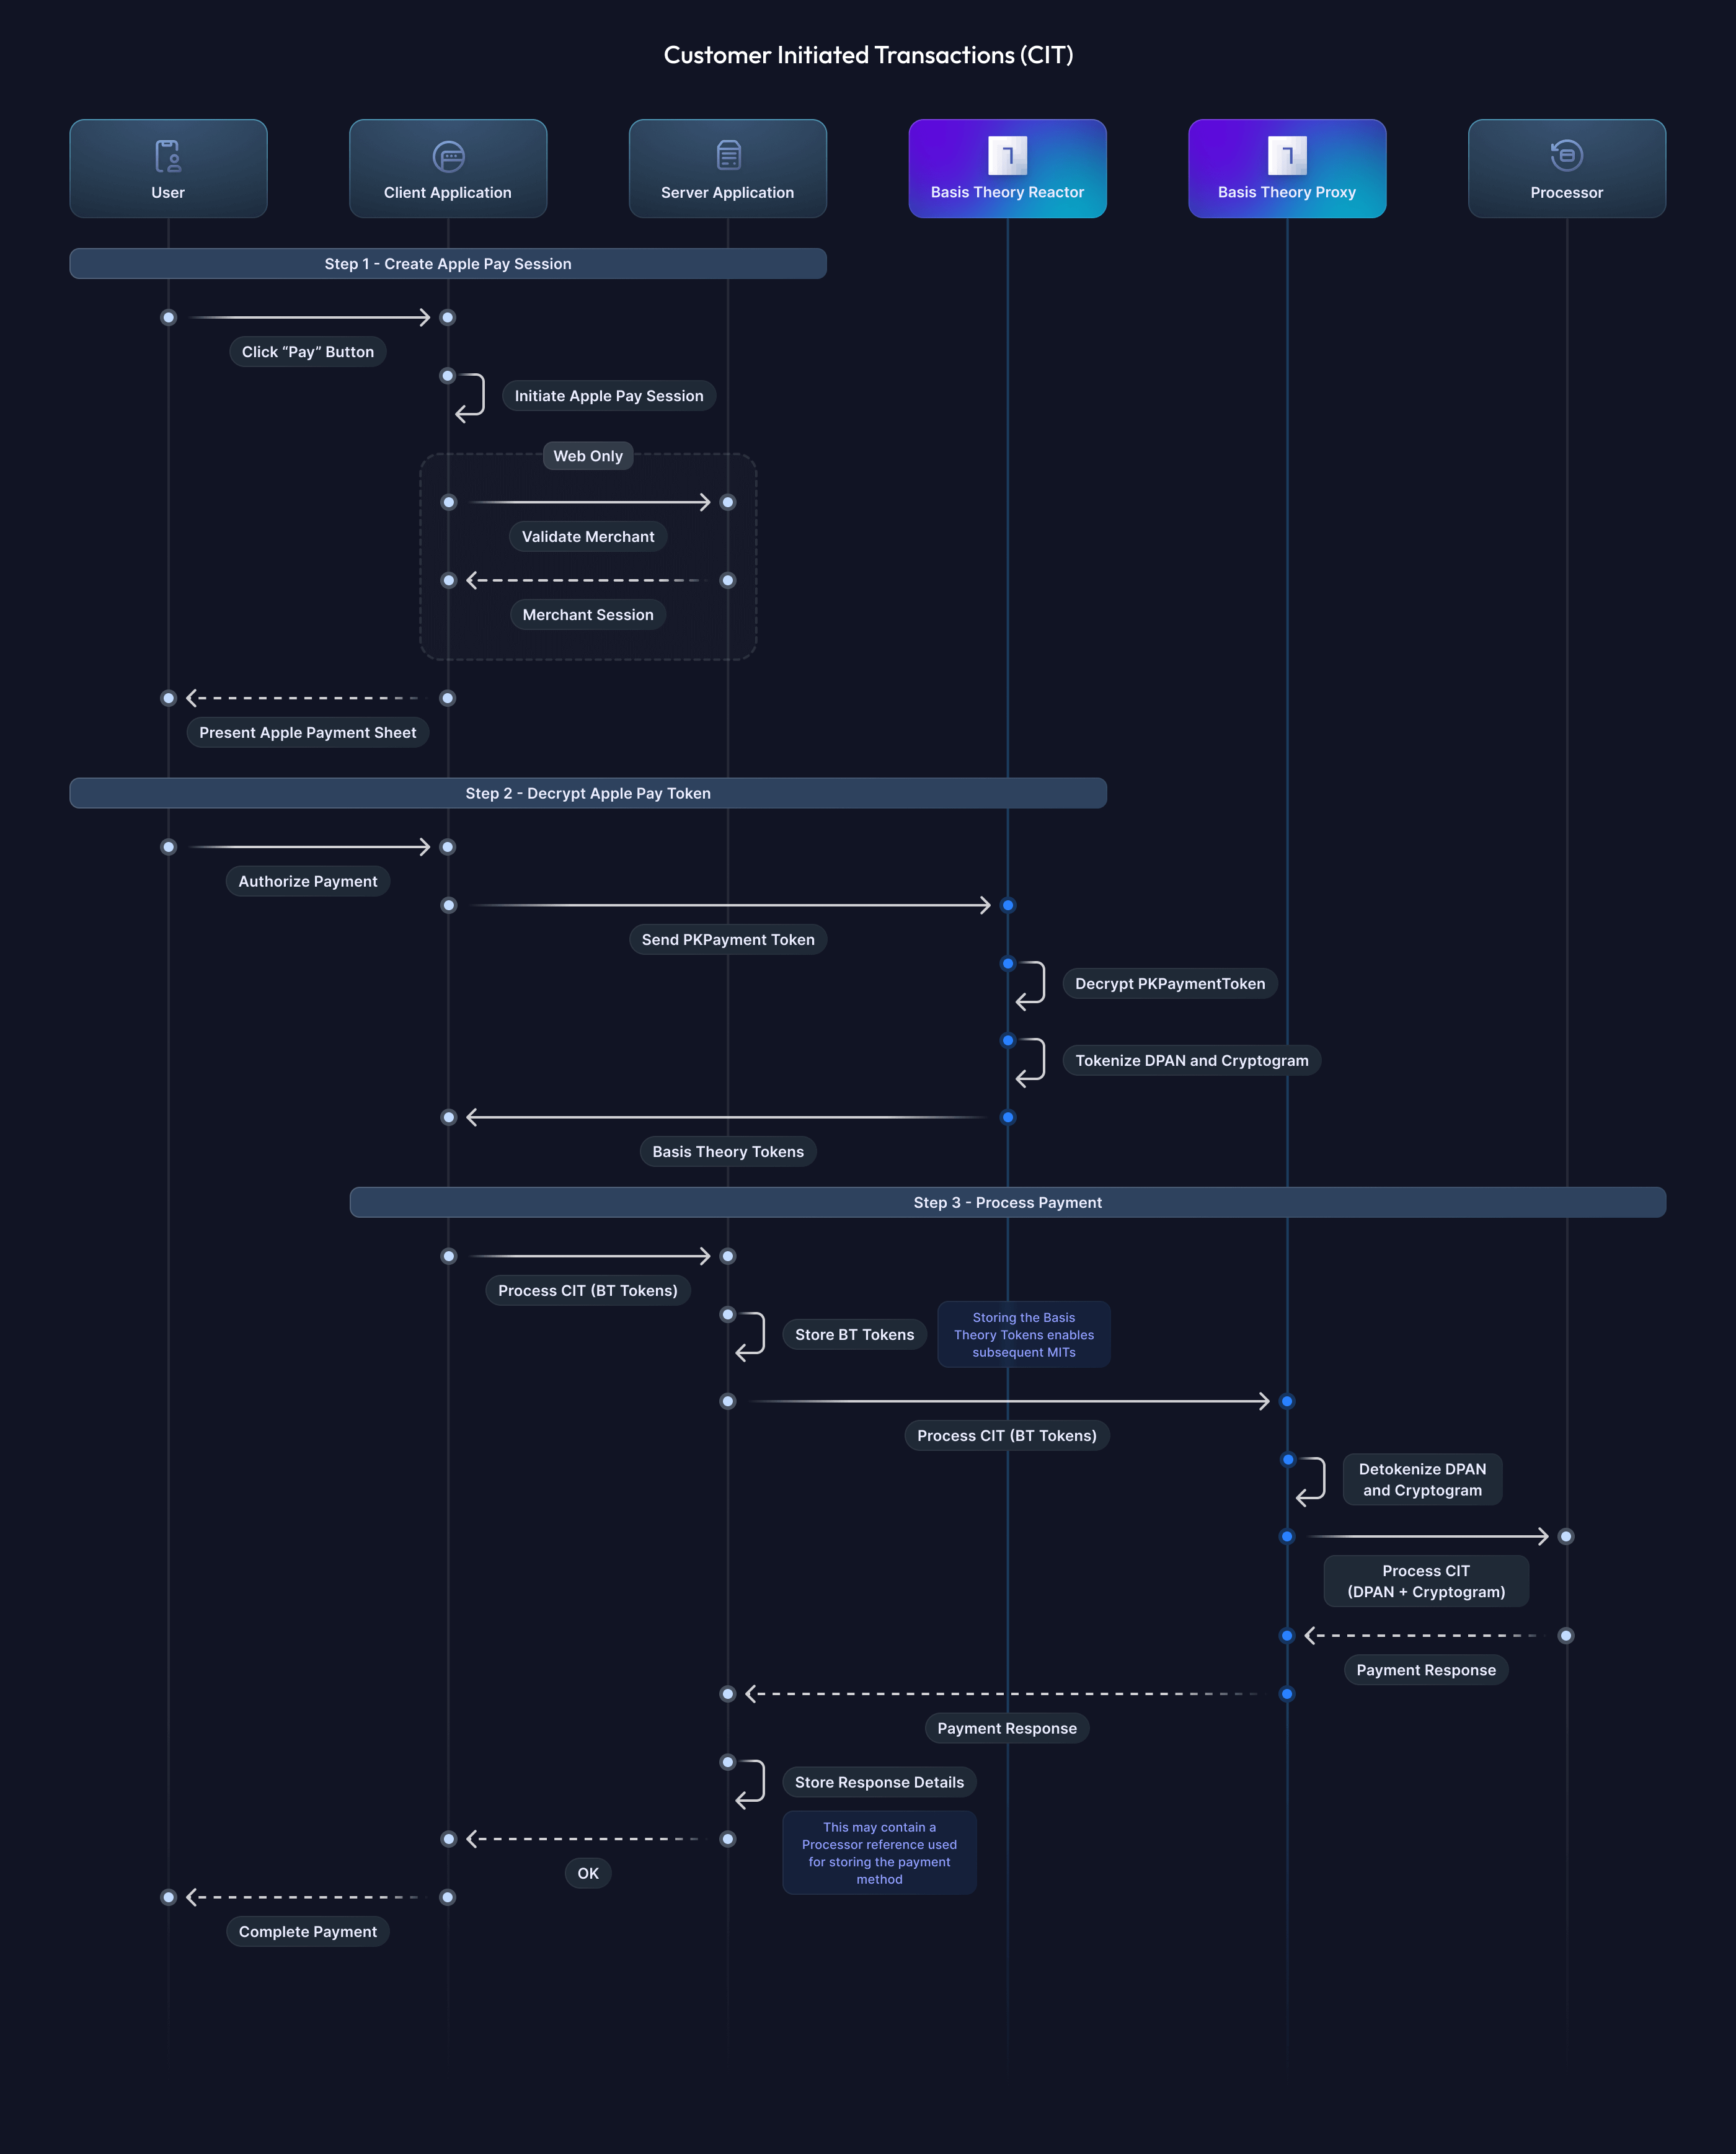
First let's take a look at the Apple Pay™ integration workflow of the two types of transactions: Customer Initiated Transactions (CIT) and Merchant Initiated Transactions (MIT).
Customer Initiated Transactions (CIT)
This type of transaction occurs when the consumer provides their payment details to the merchant, authorizing a specific transaction. Apple Pay™ has an interface called Payment Sheet, which you can customize to present details about the CIT, such as amount, description of the product(s) or service(s) being sold, coupons, ability to select delivery and billing address, etc.
When the user clicks the Apple "Pay" button, a sequence of interactions is initiated in three high-level steps:
- Create Apple Pay™ Session - the client application (iOS or Web) initiates the Apple Pay™ Session by specifying the Payment Request object to present the Payment Sheet, which can contain both CIT and MIT information. In case of Web, a merchant validation is necessary in the server-side.
- Decrypt Apple Pay™ Token - technically referred to as
PKPaymentToken, this object carries encrypted payment information such as DPAN, expiration date, transaction cryptogram, cardholder name, etc. Decryption and storage of the sensitive cardholder data is performed in Basis Theory environment, to prevent you having any PCI scope in your system. - Process Payment - the Basis Theory tokens are forwarded to the Payment Processor via Basis Theory Proxy, which translate them back to raw data before sending the request. When the successful Payment Response returns, the client application can complete the payment with Apple libraries, which plays the satisfying "ding" and ✅ animation for the user.
Merchant Initiated Transactions (MIT)
This type of transaction occurs when the Merchant processes a payment using stored card information without additional customer validation. A previous CIT is required to collect consumer authorization. Sometimes, the CIT can be a zero-dollar ($0) transaction to verify if the account is active.
Apple's Payment Sheet presented to the customer during the initial CIT workflow can contain information about the MIT, such as recurring billing amount and period, pay later and automatic reload details, etc.
In a single step, merchants can initiate transactions with the Payment Processor using the Basis Theory DPAN Token obtained from the previous workflow.

Collecting Payment Information
The integration between your client application and Apple can be done directly, without any interference from Basis Theory.
👉 Please follow Apple's official guides for Web (demo) and iOS.
Provision Resources
This section will explore the bare minimum resources necessary to securely decrypt the Apple Pay™ Token and use it to process payments. You only need to provision resources once per environment.
Management Application
To create all subsequent resources, you will need a Management Application.
Click here to create a Management Application or login to your Basis Theory account and create a new application with the following settings:
- Name - Resource Creator
- Application Type - Management
- Permissions:
application:create,reactor:create
Public Application
To represent your pubic facing application, we'll need a Public Application responsible for creating short-lived Sessions that are used to authenticate requests made against Reactors.
Using the Management Application key to authorize the request, call Basis Theory API to create a new Public Application:
curl "https://api.test.basistheory.com/applications" \
  -X "POST" \
  -H "BT-API-KEY: <MANAGEMENT_API_KEY>" \
  -H "Content-Type: application/json" \
  -d '{
    "name": "Client",
    "type": "public",
    "permissions": []
  }'
<MANAGEMENT_API_KEY> with the Management API Key you created previously.key from the created Public Application as it will be used later in this guide.Private Application
Next you will need a Private Application to create tokens within the Reactor, and authorize client sessions to invoke it. This application represents your Server.
Using the Management Application key to authorize the request, call Basis Theory API to create a new Private Application:
curl "https://api.test.basistheory.com/applications" \
  -X "POST" \
  -H "BT-API-KEY: <MANAGEMENT_API_KEY>" \
  -H "Content-Type: application/json" \
  -d '{
    "name": "Server",
    "type": "private",
    "permissions": [ "token:create", "token:use" ]
  }'
<MANAGEMENT_API_KEY> with the Management API Key you created previously.key and id from the created Private Application as it will be used later in this guide.Reactor
Now let's create a Reactor that can decrypt Apple's PKPaymentToken and store the DPAN and cryptogram.
Create a reactor.js file and paste the code below. We will use open source Basis Theory Apple Pay™ utility to easily create a context and perform decryption.
const { Buffer } = require("buffer");
const { ApplePaymentTokenContext } = require("@basis-theory/apple-pay-js");
const { CustomHttpResponseError } = require("@basis-theory/basis-theory-reactor-formulas-sdk-js");

module.exports = async function (req) {
  const {
    bt,
    args: {
      applePayToken: { paymentData, ...restApplePayToken },
    },
    configuration: { MERCHANT_IDENTITY_CERTIFICATE_PEM, PAYMENT_PROCESSING_PRIVATE_KEY_PEM },
  } = req;

  // creates token context from certificates / keys configured in Reactor
  const context = new ApplePaymentTokenContext({
    merchants: [
      {
        ...(MERCHANT_IDENTITY_CERTIFICATE_PEM && { certificatePem: Buffer.from(MERCHANT_IDENTITY_CERTIFICATE_PEM) }),
        privateKeyPem: Buffer.from(PAYMENT_PROCESSING_PRIVATE_KEY_PEM),
      },
      // add more certificates to perform automatic key rotation
    ],
  });

  try {
    // decrypts Apple's PKPaymentToken paymentData
    const {
      applicationPrimaryAccountNumber,
      applicationExpirationDate,
      paymentData: { onlinePaymentCryptogram, ...restPaymentDataPaymentData },
      ...restPaymentData
      // paymentData: { onlinePaymentCryptogram,  },
    } = context.decrypt(paymentData);

    console.log(restPaymentData);

    // vaults DPAN and cryptogram
    const { dpanToken, cryptogramToken } = await bt.tokenize({
      dpanToken: {
        type: "card",
        data: {
          number: applicationPrimaryAccountNumber,
          expiration_month: applicationExpirationDate.slice(2, 4),
          expiration_year: `20${applicationExpirationDate.slice(-2)}`,
        },
      },
      cryptogramToken: {
        type: "token",
        containers: ["/pci/high/"],
        data: onlinePaymentCryptogram,
      },
    });

    // returns transaction details and vaulted tokens, without any sensitive PCI data
    return {
      raw: {
        dpanToken,
        cryptogramToken,
        applePayToken: {
          paymentData: {
            ...restPaymentData,
            paymentData: {
              ...restPaymentDataPaymentData,
            },
          },
          ...restApplePayToken,
        },
      },
    };
  } catch (error) {
    console.error(error);
    throw new CustomHttpResponseError({
      status: 500,
      body: {
        message: error.message,
      },
    });
  }
};
Let's store the contents of the reactor.js file into a variable:
reactor_code=$(cat reactor.js)
And call Basis Theory API to create the Reactor:
curl "https://api.test.basistheory.com/reactors" \
  -H "BT-API-KEY: <MANAGEMENT_API_KEY>" \
  -H "Content-Type: application/json" \
  -X "POST" \
  -d '{
    "name": "Apple Pay™ Reactor",
    "code": '"$(echo $reactor_code | jq -Rsa .)"',
    "configuration": {
      "MERCHANT_IDENTITY_CERTIFICATE_PEM": "-----BEGIN CERTIFICATE-----\nMIIEdTCCBBugAwIBAgIIc5onAJBqqpk...",
      "PAYMENT_PROCESSING_PRIVATE_KEY_PEM": "-----BEGIN EC PARAMETERS-----\nBggqhkjOPQMBBw==..."
    },
    "application": {
      "id": "<PRIVATE_APPLICATION_ID>"
    }
  }'
Important things to notice in the request above:
<MANAGEMENT_API_KEY>is the Management Application Key, used to authenticate the requestcodeis passed in plain text form<PRIVATE_APPLICATION_ID>is the Private Application Id, used to injectreq.btin the Reactor code- The Merchant Identity Certificate (
MERCHANT_IDENTITY_CERTIFICATE_PEM) and Payment Processing Private Key are passed in plain text form as configuration entries. The Merchant Identity Certificate is only required for web integrations — it can be omitted from the Reactor configuration for iOS-only implementations.
id from the created Reactor as it will be used later to invoke it.Done! These are all the resources necessary. Let's see how to use them.
Decrypting PKPaymentToken
In this section, we will explore the integration for both the client and server applications.
Creating a Session
To invoke a Reactor, first we need to create a Session to grant temporary access to our Public Application. It is good practice to create the session when the user enters the checkout page, so it is ready by the time they click on the "Pay" button.
- Web
- iOS
import { BasisTheory } from '@basis-theory/basis-theory-js';

let bt;
let sessionKey;

// initializes Basis Theory
bt = await new BasisTheory().init("<PUBLIC_API_KEY>", { 'environment': 'test'});

const session = await bt.sessions.create();
sessionKey = session.sessionKey;
import BasisTheory

private var sessionKey: String = ""

SessionsAPI.create(apiKey: "<PUBLIC_API_KEY>") { data, error in
    self.sessionKey = data!.sessionKey!
    let nonce = data!.nonce!
}
<PUBLIC_API_KEY> with the Public API Key you created previously.Authorizing a Session
Sessions must be authorized by a Private Application to perform any protected actions. In our case, we need to allow invoking the Apple Pay™ Reactor to decrypt and tokenize the card information.
Chose your preferred language for your client application, and click below for detailed instructions on how to install and configure the SDK.
We will add a new /authorize endpoint to our backend that receives the session nonce and authorizes it with the token:use permission.
- .NET
- Go
- Node
- JavaScript (legacy)
- Python
In this example, we are using Basis Theory SDK and ASP.NET Core Framework.
using System.Collections.Generic;
using Microsoft.AspNetCore;
using Microsoft.AspNetCore.Builder;
using Microsoft.AspNetCore.Hosting;
using Microsoft.AspNetCore.Mvc;
using Microsoft.Extensions.DependencyInjection;
using Microsoft.Extensions.Hosting;

using BasisTheory.Client;

namespace server.Controllers
{
  public class Program
  {
    public static void Main(string[] args)
    {
      WebHost.CreateDefaultBuilder(args)
        .UseUrls("http://0.0.0.0:4242")
        .UseWebRoot("public")
        .UseStartup<Startup>()
        .Build()
        .Run();
    }
  }

  public class Startup
  {
    public void ConfigureServices(IServiceCollection services)
    {
      services.AddMvc().AddNewtonsoftJson();
    }
    public void Configure(IApplicationBuilder app, IWebHostEnvironment env)
    {
      if (env.IsDevelopment()) app.UseDeveloperExceptionPage();
      app.UseRouting();
      app.UseStaticFiles();
      app.UseEndpoints(endpoints => endpoints.MapControllers());
    }
  }

  [Route("authorize")]
  [ApiController]
  public class CheckoutApiController : Controller
  {
    var client = new BasisTheory(apiKey: "<PRIVATE_API_KEY>", clientOptions: new ClientOptions
    {
        BaseUrl = BasisTheoryEnvironment.Test
    });

    [HttpPost]
    public ActionResult AuthorizeSession([FromBody] string nonce)
    {
      await client.Sessions.AuthorizeAsync(new AuthorizeSessionRequest {
        Nonce = nonce,
        Permissions = new List<String> { "token:use" }
      });
      return new StatusCodeResult(204);
    }
  }
}
In this example, we are using Basis Theory SDK and Go HTTP package.
package main

import (
    "log"
    "net/http"
    "context"
    "encoding/json"
)
import (
  basistheoryclient "github.com/Basis-Theory/go-sdk/client"
  "github.com/Basis-Theory/go-sdk/option"
)

func main() {
  http.HandleFunc("/authorize", authorizeSession)
  addr := "localhost:4242"
  log.Printf("Listening on %s", addr)
  log.Fatal(http.ListenAndServe(addr, nil))
}

func authorizeSession(rw http.ResponseWriter, r *http.Request) {
  var payload map[string]interface{}
  json.NewDecoder(r.Body).Decode(&payload)

  client := basistheoryclient.NewClient(
    option.WithAPIKey("<PRIVATE_API_KEY>"),
  )

  authorizeSessionRequest := basistheory.AuthorizeSessionRequest{
    Nonce: payload["nonce"].(string),
    Permissions: []string{"token:use"},
  }

  authorizedSession := client.Sessions.Authorize(context.Background(), &authorizeSessionRequest)

  w.WriteHeader(http.StatusNoContent)
}
In this example, we are using Basis Theory SDK and Express framework for Node.js.
const express = require("express");
const cors = require("cors");
const { BasisTheoryClient, BasisTheory } = require("@basis-theory/node-sdk");

const app = express();
const port = 4242;

app.use(cors());
app.use(express.json());

app.post("/authorize", async (request, response) => {
  const bt = await new BasisTheoryClient({ apiKey: "<PRIVATE_API_KEY>", environment: BasisTheoryEnvironment.Test });
  const { nonce } = request.body;
  // authorizing a session returns an empty 200 response
  await bt.sessions.authorize({
    nonce: nonce,
    permissions: ['token:use']
  });
  response.status(204).send();
});

app.listen(port, () => {
  console.log(`Server listening on port ${port}`);
});
In this example, we are using Basis Theory SDK and Express framework for Node.js.
const express = require("express");
const cors = require("cors");
const { BasisTheory } = require("@basis-theory/basis-theory-js");

const app = express();
const port = 4242;

app.use(cors());
app.use(express.json());

app.post("/authorize", async (request, response) => {
  const bt = await new BasisTheory().init("<PRIVATE_API_KEY>", { 'environment': 'test'});
  const { nonce } = request.body;
  // authorizing a session returns an empty 200 response
  await bt.sessions.authorize({
    nonce: nonce,
    permissions: ["token:use"]
  });
  response.status(204).send();
});

app.listen(port, () => {
  console.log(`Server listening on port ${port}`);
});
In this example, we are using Basis Theory SDK and Flask Framework.
import os
from flask import Flask, request

import basistheory
from basis_theory import BasisTheory

app = Flask(__name__)

@app.route('/authorize', methods=['POST'])
def authorize_session():
  body = request.get_json()
  client = BasisTheory(
    api_key="<PRIVATE_API_KEY>",
    environment=BasisTheoryEnvironment.TEST
  )

  client.sessions.authorize(
    nonce = body.get("nonce"),
    permissions = ["token:use"]
  ))

  return '', 204

if __name__ == '__main__':
    app.run(port=4242)
<PRIVATE_API_KEY> with the Private API Key you created previously.Now let's have our frontend call this new endpoint passing the session nonce.
- Web
- iOS
import { BasisTheory } from '@basis-theory/basis-theory-js';

let bt;
let sessionKey;

// initializes Basis Theory
bt = await new BasisTheory().init("<PUBLIC_API_KEY>", { 'environment': 'test'});

const session = await bt.sessions.create();
sessionKey = session.sessionKey;

await fetch('http://localhost:4242/authorize', {
  method: 'POST',
  headers: {
    'Content-Type': 'application/json'
  },
  body: JSON.stringify({ nonce: session.nonce }),
});
import BasisTheory

private var sessionKey: String = ""

func authorizeSession(nonce: String, completion: @escaping ([String: Any]?, Error?) -> Void) {
    let parameters = ["nonce": nonce]

    let url = URL(string: "http://localhost:4242/authorize")!
    let session = URLSession.shared

    var request = URLRequest(url: url)
    request.httpMethod = "POST"

    do {
        request.httpBody = try JSONSerialization.data(withJSONObject: parameters, options: .prettyPrinted)
    } catch let error {
        completion(nil, error)
    }

    request.addValue("application/json", forHTTPHeaderField: "Content-Type")
    request.addValue("application/json", forHTTPHeaderField: "Accept")

    let task = session.dataTask(with: request, completionHandler: { data, response, error in
        guard error == nil else {
            completion(nil, error)
            return
        }

        do {
            let json = try JSONSerialization.jsonObject(with: data!, options: .mutableContainers) as? [String: Any]
            completion(json, nil)
        } catch let error {
            completion(nil, error)
        }
    })

    task.resume()
}

SessionsAPI.create(apiKey: "<PUBLIC_API_KEY>") { data, error in
    self.sessionKey = data!.sessionKey!
    let nonce = data!.nonce!
    self.authorizeSession(nonce: nonce) { result, error in

    }
}
expires_at value when authorizing the session, to ensure users have time to customize options in the Apple Pay™ Sheet and approve the payment.Invoking the Reactor
Once the user has authorized the payment with Touch ID, Face ID, or passcode, the Apple Pay™ Session will invoke the payment authorization event handler, passing the PKPaymentToken, which we will post to the Reactor.
- Web
- iOS
import { BasisTheory } from '@basis-theory/basis-theory-js';

let bt;
let sessionKey;

// initializes Basis Theory
bt = await new BasisTheory().init("<PUBLIC_API_KEY>", { 'environment': 'test'});

const session = await bt.sessions.create();
sessionKey = session.sessionKey;

await fetch('http://localhost:4242/authorize', {
  method: 'POST',
  headers: {
    'Content-Type': 'application/json'
  },
  body: JSON.stringify({ nonce: session.nonce }),
});

session.onpaymentauthorized = async (event: any) => {
  try {
    const {
      raw: {
        dpanToken,
        cryptogramToken,
        applePayToken
      }
    } = await bt.reactors.react('<REACTOR_ID>', {
      args: {
        applePayToken: event.payment.token,
      }
    }, {
      apiKey: sessionKey
    });
  } catch (error) {
    console.error(error);
    session.completePayment({
      status: 1,
    });
  }
};
import BasisTheory

private var sessionKey: String = ""

...

func paymentAuthorizationController(_ controller: PKPaymentAuthorizationController, didAuthorizePayment payment: PKPayment, handler completion: @escaping (PKPaymentAuthorizationResult) -> Void) {
    let paymentData = try? JSONSerialization.jsonObject(with: payment.token.paymentData)

    let reactRequest = ReactRequest(args: [
        "applePayToken": [
            "paymentMethod": [
                "displayName": payment.token.paymentMethod.displayName,
                "network": payment.token.paymentMethod.network?.rawValue,
                "type": payment.token.paymentMethod.type.rawValue
            ],
            "transactionIdentifier": payment.token.transactionIdentifier,
            "paymentData": paymentData
        ]
    ])

    ReactorsAPI.reactWithRequestBuilder(id: UUID(uuidString: "<REACTOR_ID>")!, reactRequest: reactRequest).addHeader(name: "BT-API-KEY", value: "<SESSION_KEY>").execute { result in
        do {

        } catch {
            print(error)
        }
    }
}
<REACTOR_ID> with the Reactor Id you created previously.Processing Payment
Now that the Apple Pay™ Payment Token has been decrypted and the payment information (DPAN and 3DS cryptogram) have been tokenized, send the tokens to your backend and store them in your database. You will use their identifiers to route the detokenized data to the Payment Processor of your choice.
Each Payment Processor has their specification for receiving DPANs and 3DS cryptograms for CITs, or just DPANs for MITs. Here are a few things to know when looking into their API specification:
- Payment Processor usually have their own Apple Pay™ solution, which will implement both frontend and backend portions. While it may feel like an easier technical integration, it locks in the merchant and their tokens in their ecosystem.
- It is not surprising that this sort of payment method acceptance is either buried in the Processor's technical documentation or private.
- DPAN acts as a Network Token downstream in the transaction processing workflow, accompanied by the transaction cryptogram and Electronic Commerce Indicator (ECI).
Look at the Process Card Payments guide to learn how to forward tokens to Payment Processors using the Basis Theory Proxy. If you have difficulty figuring out when and which Processor's API endpoints to call, feel free to contact us. We are happy to support you through your payment journey.
Apple Pay™ requires merchants to complete the payment in 30 seconds; however, in many cases, that is not possible in practice. So once you have tokenized the payment information, you can call the completion handler to give the user the green check but keep processing in the background.
- Web
- iOS
import { BasisTheory } from '@basis-theory/basis-theory-js';

...

session.onpaymentauthorized = async (event: any) => {
  try {
    const {
      raw: {
        dpanToken,
        cryptogramToken,
        applePayToken
      }
    } = await bt.reactors.react('<REACTOR_ID', {
      args: {
        applePayToken: event.payment.token,
      }
    }, {
      apiKey: sessionKey
    });
    session.completePayment({
      status: 0,
    });
    // TODO send tokens to backend for transaction processing
  } catch (error) {
    console.error(error);
    session.completePayment({
      status: 1,
    });
  }
};
import BasisTheory

private var sessionKey: String = ""

...

func paymentAuthorizationController(_ controller: PKPaymentAuthorizationController, didAuthorizePayment payment: PKPayment, handler completion: @escaping (PKPaymentAuthorizationResult) -> Void) {
    let paymentData = try? JSONSerialization.jsonObject(with: payment.token.paymentData)

    let reactRequest = ReactRequest(args: [
        "applePayToken": [
            "paymentMethod": [
                "displayName": payment.token.paymentMethod.displayName,
                "network": payment.token.paymentMethod.network?.rawValue,
                "type": payment.token.paymentMethod.type.rawValue
            ],
            "transactionIdentifier": payment.token.transactionIdentifier,
            "paymentData": paymentData
        ]
    ])

    ReactorsAPI.reactWithRequestBuilder(id: UUID(uuidString: "<REACTOR_ID>")!, reactRequest: reactRequest).addHeader(name: "BT-API-KEY", value: "<SESSION_KEY>").execute { result in
        do {
          completion(PKPaymentAuthorizationResult(status: PKPaymentAuthorizationStatus.success, errors: errors))
          // TODO send tokens to backend for transaction processing
        } catch {
            print(error)
        }
    }
}