Collect Cards
When building an e-commerce application, subscription service, or enabling one-time purchases, one of the critical requirements is collecting and storing cardholder data securely. However, it can be challenging to navigate PCI DSS and ensure that your application meets all the necessary security controls required to comply.
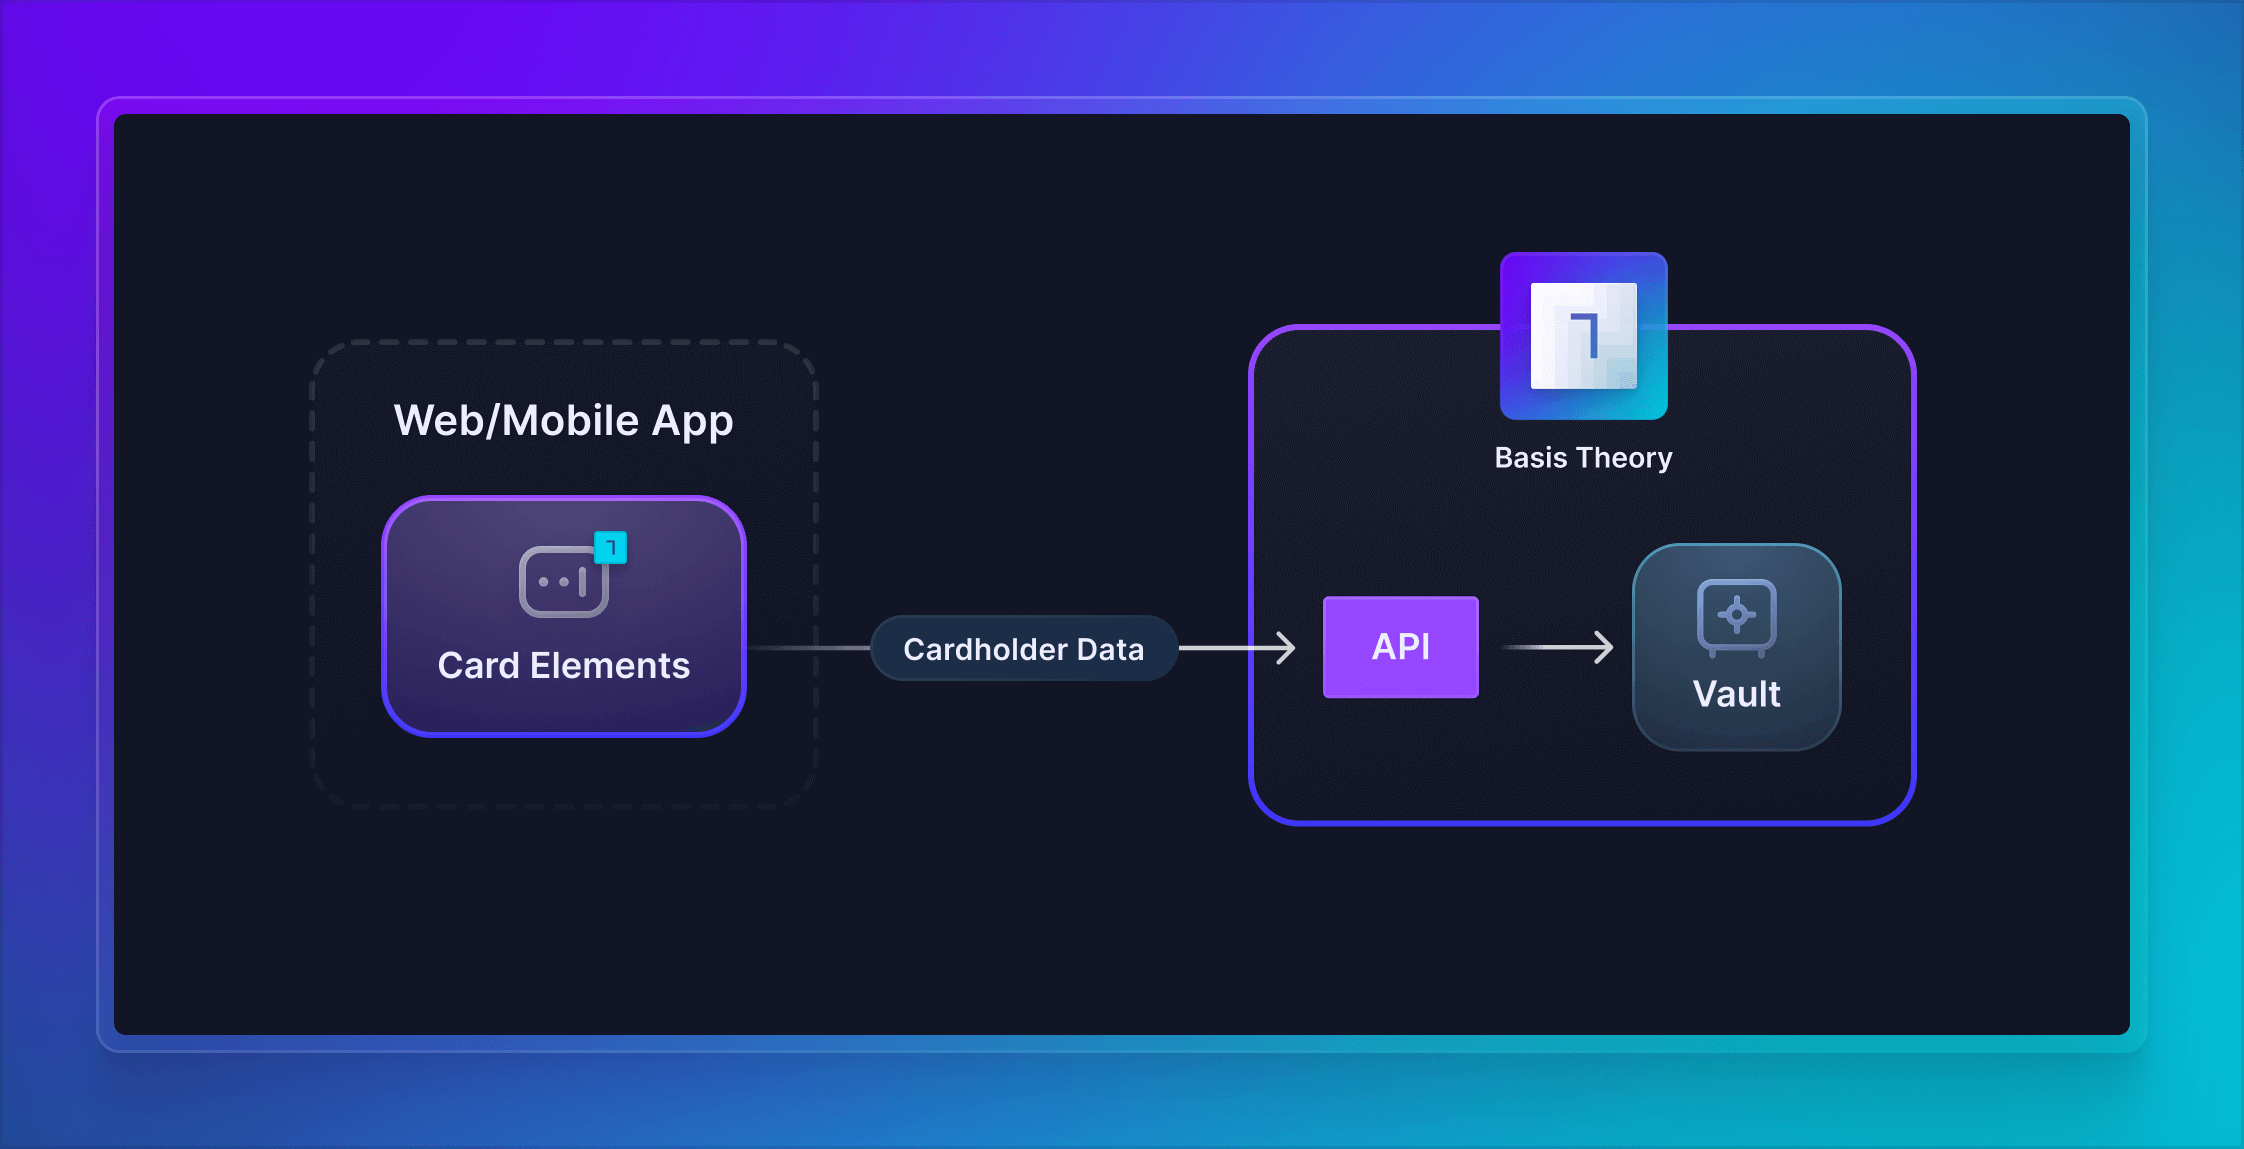
In this guide, we will set up Basis Theory SDKs to capture cards in a frontend application, Web or Mobile, and securely store the cardholder data as tokens with the Basis Theory Platform. Given this guide is followed step by step, you are substantially de-scoping your user-facing applications and database from PCI DSS compliance. If you want to learn more how we can help you meet up to 95% of the PCI requirements, or if you need help filling out your SAQ, reach out to our team!
If you are looking for a way to use your inputs to capture your user's cards, and understand the security concerns and compliance impact it represents, follow the Collect Cards With Your Inputs guide.
Getting Started
To get started, you will need to create a Basis Theory Account and a TEST Tenant.
Creating a Public Application
Next you will need a Public Application using our PCI-compliant template Collect PCI Data. Click here to create one.
This will create an application with the following Access Controls:
- Permissions:
token:create,token:update - Containers:
/pci/ - Transform:
mask
Configuring Basis Theory Elements
Basis Theory Elements are available for the following technologies. Click below for detailed instructions on how to install and configure them.


Adding Card Elements
Once installed and configured, add the Card Elements to your application. This will enable your users to type in their card data in your form, while ensuring your systems never come in contact with the data.
CardElement with Javascript or React.- JavaScript
- React
- iOS
- Android
- React Native
<div id="cardNumber"></div>
<div style="display: flex;">
  <div id="cardExpirationDate" style="width: 100%;"></div>
  <div id="cardVerificationCode" style="width: 100%;"></div>
</div>
import { basistheory } from '@basis-theory/web-elements';

let bt;
let cardNumberElement;
let cardExpirationDateElement;
let cardVerificationCodeElement;

async function init() {
  bt = await basistheory('<API_KEY>', { 'environment': 'test'});

  // Creates Elements instances
  cardNumberElement = bt.createElement('cardNumber', {
    targetId: 'myCardNumber' // (custom) used for tracking validation errors
  });
  cardExpirationDateElement = bt.createElement('cardExpirationDate', {
    targetId: 'myCardExpiration'
  });
  cardVerificationCodeElement = bt.createElement('cardVerificationCode', {
    targetId: 'myCardVerification'
  });

  // Mounts Elements in the DOM in parallel
  await Promise.all([
    cardNumberElement.mount('#cardNumber'),
    cardExpirationDateElement.mount('#cardExpirationDate'),
    cardVerificationCodeElement.mount('#cardVerificationCode'),
  ]);

  // Binds card brand to verification code element
  cardNumberElement.on('change', ({ cardBrand }) => {
    cardVerificationCodeElement.update({ cardBrand });
  });
}

init();
import React, { useRef, useState } from 'react';
import {
  BasisTheoryProvider,
  CardNumberElement,
  CardExpirationDateElement,
  CardVerificationCodeElement,
  useBasisTheory,
} from '@basis-theory/react-elements';

export default function App() {
  const { bt } = useBasisTheory('<API_KEY>', { 'environment': 'test'});
  // Refs to get access to the Elements instance
  const cardNumberRef = useRef(null);
  const cardExpirationRef = useRef(null);
  const cardVerificationRef = useRef(null);

  // stores the current card brand in state, to pass to CardVerificationCodeElement
  const [cardBrand, setCardBrand] = useState();

  return (
    <BasisTheoryProvider bt={bt}>
      <CardNumberElement
        id="myCardNumber"
        ref={cardNumberRef}
        onChange={({ cardBrand }) => setCardBrand(cardBrand)}
      />
      <div style={{ display: 'flex' }}>
        <div style={{ width: "100%" }}>
          <CardExpirationDateElement
            id="myCardExpiration"
            ref={cardExpirationRef}
          />
        </div>
        <div style={{ width: "100%" }}>
          <CardVerificationCodeElement
            id="myCardVerification"
            ref={cardVerificationRef}
            cardBrand={cardBrand}
          />
        </div>
      </div>
    </BasisTheoryProvider>
  );
}
import Foundation
import UIKit
import BasisTheoryElements
import Combine

class ViewController: UIViewController {
    @IBOutlet weak var cardNumberTextField: CardNumberUITextField!
    @IBOutlet weak var expirationDateTextField: CardExpirationDateUITextField!
    @IBOutlet weak var cvcTextField: CardVerificationCodeUITextField!

    override func viewDidLoad() {
        super.viewDidLoad()

        // Binds card brand to verification code element
        let cvcOptions = CardVerificationCodeOptions(cardNumberUITextField: cardNumberTextField)
        cvcTextField.setConfig(options: cvcOptions)
    }
}
<?xml version="1.0" encoding="utf-8"?>
<androidx.constraintlayout.widget.ConstraintLayout xmlns:android="http://schemas.android.com/apk/res/android"
    xmlns:app="http://schemas.android.com/apk/res-auto"
    xmlns:tools="http://schemas.android.com/tools"
    android:layout_width="match_parent"
    android:layout_height="match_parent"
    tools:context=".MainActivity">

    <LinearLayout
        android:layout_width="match_parent"
        android:layout_height="wrap_content"
        android:layout_margin="20dp"
        android:orientation="vertical"
        app:layout_constraintEnd_toEndOf="parent"
        app:layout_constraintStart_toStartOf="parent"
        app:layout_constraintTop_toTopOf="parent">

        <com.basistheory.android.view.CardNumberElement
            android:id="@+id/card_number"
            android:layout_width="match_parent"
            android:layout_height="wrap_content" />
        <com.basistheory.android.view.CardExpirationDateElement
            android:id="@+id/expiration_date"
            android:layout_width="match_parent"
            android:layout_height="wrap_content" />
        <com.basistheory.android.view.CardVerificationCodeElement
            android:id="@+id/cvc"
            android:layout_width="match_parent"
            android:layout_height="wrap_content" />
    </LinearLayout>

</androidx.constraintlayout.widget.ConstraintLayout>
import com.basistheory.android.view.CardNumberElement
import com.basistheory.android.view.CardExpirationDateElement
import com.basistheory.android.view.CardVerificationCodeElement
import com.basistheory.android.service.BasisTheoryElements

class MainActivity : AppCompatActivity() {

    private lateinit var cardNumberElement: CardNumberElement
    private lateinit var cardExpirationDateElement: CardExpirationDateElement
    private lateinit var cardVerificationCodeElement: CardVerificationCodeElement

    override fun onCreate(savedInstanceState: Bundle?) {
        super.onCreate(savedInstanceState)
        setContentView(R.layout.activity_main)

        cardNumberElement = findViewById(R.id.card_number)
        cardExpirationDateElement = findViewById(R.id.expiration_date)
        cardVerificationCodeElement = findViewById(R.id.cvc)

        // Binds card brand to verification code element
        cardVerificationCodeElement.cardNumberElement = cardNumberElement
    }
}
import React, { useRef } from "react";
import { SafeAreaView, ScrollView, StatusBar, StyleSheet, View } from "react-native";
import type { BTRef } from "@basis-theory/react-native-elements";
import { CardNumberElement, CardExpirationDateElement, CardVerificationCodeElement } from "@basis-theory/react-native-elements";

const App = (): JSX.Element => {
  const cardNumberRef = useRef<BTRef>(null);
  const cardExpirationDateRef = useRef<BTRef>(null);
  const cardVerificationCodeRef = useRef<BTRef>(null);

  return (
    <SafeAreaView>
      <StatusBar />
      <ScrollView contentInsetAdjustmentBehavior="automatic">
        <View style={styles.viewContainer}>
          <CardNumberElement btRef={cardNumberRef} placeholder="Card Number" style={styles.elements} />
          <CardExpirationDateElement btRef={cardExpirationDateRef} placeholder="Card Expiration Date" style={styles.elements} />
          <CardVerificationCodeElement btRef={cardVerificationCodeRef} placeholder="CVC" style={styles.elements} />
        </View>
      </ScrollView>
    </SafeAreaView>
  );
};

const styles = StyleSheet.create({
  cardNumber: {
    backgroundColor: "#eeeeee",
    borderColor: "blue",
    borderWidth: 2,
    color: "purple",
    height: 40,
    margin: 12,
    padding: 10,
  },
  viewContainer: {
    display: "flex",
    flexDirection: "column",
    marginTop: 32,
  },
});

export default App;
Storing Cards
Now that you are securely capturing the cardholder data in your user-facing application(s), it is time to store it in your Basis Theory Tenant.
To do this, we will invoke the Create Token endpoint from the SDK, passing the Card Elements as data points in the payload. This will securely create a card token by transferring the card information from the frontend Elements to Basis Theory, where the data will be strongly encrypted and stored in a compliant environment.
Add a submit function along with a button to trigger it:
- JavaScript
- React
- iOS
- Android
- React Native
<div id="cardNumber"></div>
<div style="display: flex;">
  <div id="cardExpirationDate" style="width: 100%;"></div>
  <div id="cardVerificationCode" style="width: 100%;"></div>
</div>
<button id="submit">Submit</button>
import { BasisTheory } from '@basis-theory/basis-theory-js';

let bt;
let cardNumberElement;
let cardExpirationDateElement;
let cardVerificationCodeElement;

async function init () {
  ...
  document.getElementById("submit").addEventListener("click", submit);
}

async function submit () {
  try {
    const token = await bt.tokens.create({
      type: 'card',
      data: {
        number: cardNumberElement,
        expiration_month: cardExpirationDateElement.month(),
        expiration_year: cardExpirationDateElement.year(),
        cvc: cardVerificationCodeElement,
      }
    });
    // store token.id in your database
  } catch (error) {
    console.error(error);
  }
}

init();
import React, { useRef, useState } from 'react';
import {
  BasisTheoryProvider,
  CardNumberElement,
  CardExpirationDateElement,
  CardVerificationCodeElement,
  useBasisTheory,
} from '@basis-theory/react-elements';

export default function App() {
  const { bt } = useBasisTheory('<API_KEY>', { 'environment': 'test'});
  // Refs to get access to the Elements instance
  const cardNumberRef = useRef(null);
  const cardExpirationRef = useRef(null);
  const cardVerificationRef = useRef(null);
  // stores the current card brand in state, to pass to CardVerificationCodeElement
  const [cardBrand, setCardBrand] = useState();

  const submit = async () => {
    try {
      const token = await bt?.tokens.create({
        type: 'card',
        data: {
          number: cardNumberRef.current,
          expiration_month: cardExpirationRef.current.month(),
          expiration_year: cardExpirationRef.current.year(),
          cvc: cardVerificationRef.current,
        }
      });
      // store token.id in your database
    } catch (error) {
      console.error(error);
    }
  }

  return (
    <BasisTheoryProvider bt={bt}>
      ...
      <button onClick={submit}>Submit</button>
    </BasisTheoryProvider>
  );
}
Add a new UIButton to your Main.storyboard and create a new Action for it called submit.
import Foundation
import UIKit
import BasisTheoryElements
import Combine

class ViewController: UIViewController {
    @IBOutlet weak var cardNumberTextField: CardNumberUITextField!
    @IBOutlet weak var expirationDateTextField: CardExpirationDateUITextField!
    @IBOutlet weak var cvcTextField: CardVerificationCodeUITextField!

    @IBAction func submit(_ sender: Any) {
        let body: [String: Any] = [
            "type": "card",
            "data": [
                "number": self.cardNumberTextField,
                "expiration_month": self.expirationDateTextField.month(),
                "expiration_year": self.expirationDateTextField.year(),
                "cvc": self.cvcTextField
            ]
        ]

        BasisTheoryElements.tokenize(body: body, apiKey: "<API_KEY>") { token, error in
            guard error == nil else {
                print(error)
                return
            }
            // store token.id in your database
        }
    }

    override func viewDidLoad() { ... }

}
<?xml version="1.0" encoding="utf-8"?>
<androidx.constraintlayout.widget.ConstraintLayout xmlns:android="http://schemas.android.com/apk/res/android"
    xmlns:app="http://schemas.android.com/apk/res-auto"
    xmlns:tools="http://schemas.android.com/tools"
    android:layout_width="match_parent"
    android:layout_height="match_parent"
    tools:context=".MainActivity">

    <LinearLayout
        android:layout_width="match_parent"
        android:layout_height="wrap_content"
        android:layout_margin="20dp"
        android:orientation="vertical"
        app:layout_constraintEnd_toEndOf="parent"
        app:layout_constraintStart_toStartOf="parent"
        app:layout_constraintTop_toTopOf="parent">

        ...

        <Button
            android:id="@+id/submit_button"
            android:layout_width="wrap_content"
            android:layout_height="wrap_content"
            android:layout_marginTop="20dp"
            android:backgroundTint="#00A4BA"
            android:text="Submit" />
    </LinearLayout>

</androidx.constraintlayout.widget.ConstraintLayout>
import com.basistheory.android.view.CardNumberElement
import com.basistheory.android.view.CardExpirationDateElement
import com.basistheory.android.view.CardVerificationCodeElement
import com.basistheory.android.service.BasisTheoryElements

class MainActivity : AppCompatActivity() {

    private lateinit var cardNumberElement: CardNumberElement
    private lateinit var cardExpirationDateElement: CardExpirationDateElement
    private lateinit var cardVerificationCodeElement: CardVerificationCodeElement
    private lateinit var button: Button;

    private val bt = BasisTheoryElements.builder()
        .apiKey("<API_KEY>")
        .environment(Environment.TEST)
        .build()


    override fun onCreate(savedInstanceState: Bundle?) {
        super.onCreate(savedInstanceState)
        setContentView(R.layout.activity_main)

        cardNumberElement = findViewById(R.id.card_number)
        cardExpirationDateElement = findViewById(R.id.expiration_date)
        cardVerificationCodeElement = findViewById(R.id.cvc)
        button = findViewById(R.id.submit_button)
        button.setOnClickListener {
            submit()
        }

        // Binds card brand to verification code element
        cardVerificationCodeElement.cardNumberElement = cardNumberElement
    }

    private fun submit() {
      val token = runBlocking {
        bt.tokenize(object {
          val type = "card"
          val data = object {
            val number = cardNumberElement
            val expiration_month = cardExpirationDateElement.month()
            val expiration_year = cardExpirationDateElement.year()
            val cvc = cardVerificationCodeElement
          }
        })
      }
      // store token.id in your database
    }
}
import React, { useRef } from "react";
import { Button, SafeAreaView, ScrollView, StatusBar, StyleSheet, View } from "react-native";
import type { BTRef } from "@basis-theory/react-native-elements";
import { CardNumberElement, CardExpirationDateElement, CardVerificationCodeElement, useBasisTheory } from "@basis-theory/react-native-elements";

const App = (): JSX.Element => {
  const { bt } = useBasisTheory('<PUBLIC_API_KEY>', { 'environment': 'test'});

  const cardNumberRef = useRef<BTRef>(null);
  const cardExpirationDateRef = useRef<BTRef>(null);
  const cardVerificationCodeRef = useRef<BTRef>(null);

  const submit = async () => {
      try {
        const token = await bt?.tokens.create({
          type: 'card',
          data: {
            number: cardNumberRef.current,
            expiration_month: cardExpirationRef.current.month(),
            expiration_year: cardExpirationRef.current.year(),
            cvc: cardVerificationRef.current,
          }
        });
        // store token.id in your database
      } catch (error) {
        console.error(error);
      }
    }

  return (
    <SafeAreaView>
      <StatusBar />
      <ScrollView contentInsetAdjustmentBehavior="automatic">
        <View style={styles.viewContainer}>
          <CardNumberElement btRef={cardNumberRef} placeholder="Card Number" style={styles.elements} />
          <CardExpirationDateElement btRef={cardExpirationDateRef} placeholder="Card Expiration Date" style={styles.elements} />
          <CardVerificationCodeElement btRef={cardVerificationCodeRef} placeholder="CVC" style={styles.elements} />
        </View>
        <Button onPress={submit} title="Submit" />
      </ScrollView>
    </SafeAreaView>
  );
};

const styles = StyleSheet.create({
  cardNumber: {
    backgroundColor: "#eeeeee",
    borderColor: "blue",
    borderWidth: 2,
    color: "purple",
    height: 40,
    margin: 12,
    padding: 10,
  },
  viewContainer: {
    display: "flex",
    flexDirection: "column",
    marginTop: 32,
  },
});

export default App;
<API_KEY> with the Public API Key you created in the Creating a Public Application step.The created card token object contains the non-sensitive information about the tokenized card, which follows the Card Token specification:
{
  "id": "d2cbc1b4-5c3a-45a3-9ee2-392a1c475ab4",
  "type": "card",
  "tenant_id": "15f48eb5-8b52-4cdd-a396-608f7cf001d0",
  "data": {
    "number": "XXXXXXXXXXXX4242",
    "expiration_month": 12,
    "expiration_year": 2025
  },
  "created_by": "4a6ae2a6-79f8-4640-968f-88db913743df",
  "created_at": "2023-04-17T12:54:44.8320458+00:00",
  "mask": {
    "number": "{{ data.number | reveal_last: 4 }}",
    "expiration_month": "{{ data.expiration_month }}",
    "expiration_year": "{{ data.expiration_year }}"
  },
  "search_indexes": [],
  "containers": [
    "/pci/high/"
  ]
}
You can safely store the token's primary key id in your database to link it with the appropriate checkout, user profile, subscription, or any other record that requires association with the card.
Notice how the card number, also known as Primary Account Number (PAN), has been masked before it is returned to your application. This default behavior prevents your application being pulled in additional PCI DSS scope, since it only comes in contact with a truncated portion of the cardholder data. Later in this guide we will learn how to customize masking.
Customizing Tokens
The steps so far cover most cases when you need to collect cards in your frontend and store them in a secure location. However, in some scenarios you may need to customize your card tokens for specific business needs or technical requirements. In the following sections, you will find optional steps to follow for common problems solved by Basis Theory Token capabilities.
Deduplication
Companies often find it necessary to uniquely identify cards flowing through their systems for various reasons, which may include: preventing fraudulent transactions, detecting credit cards abuse, building consumer profiles or streamlining payment processing for a better user experience.
By leveraging token fingerprinting, developers can recognize the tokenized data in a customizable fashion, without having to touch the plaintext data. For cards, it is common to index in the Primary Account Number (PAN). In some cases the expiration date may also be considered.
When making the tokenization request to store the card, pass a fingerprint expression to instruct Basis Theory to calculate the fingerprint for the sensitive data field:
- JavaScript
- React
- iOS
- Android
- React Native
async function submit () {
  try {
    const token = await bt.tokens.create({
      type: 'card',
      data: {
        number: cardNumberElement,
        expiration_month: cardExpirationDateElement.month(),
        expiration_year: cardExpirationDateElement.year(),
        cvc: cardVerificationCodeElement,
      },
      fingerprintExpression: '{{ data.number }}',
    });
  } catch (error) {
    console.error(error);
  }
}
export default function App() {
  const submit = async () => {
    try {
      const token = await bt?.tokens.create({
        type: 'card',
        data: {
          number: cardNumberRef.current,
          expiration_month: cardExpirationRef.current.month(),
          expiration_year: cardExpirationRef.current.year(),
          cvc: cardVerificationRef.current,
        },
        fingerprintExpression: '{{ data.number }}',
      });
    } catch (error) {
      console.error(error);
    }
  }

  return (...);
}
class ViewController: UIViewController {
    @IBAction func submit(_ sender: Any) {
        let body: [String: Any] = [
            "type": "card",
            "data": [
                "number": self.cardNumberTextField,
                "expiration_month": self.expirationDateTextField.month(),
                "expiration_year": self.expirationDateTextField.year(),
                "cvc": self.cvcTextField
            ],
            "fingerprint_expression": "{{ data.number }}"
        ]

        BasisTheoryElements.tokenize(body: body, apiKey: "<API_KEY>") { token, error in
            guard error == nil else {
                print(error)
                return
            }
        }
    }
}
class MainActivity : AppCompatActivity() {

    private fun submit() {
      val token = runBlocking {
        bt.tokens.create(object {
          val type = "card"
          val data = object {
            val number = cardNumberElement
            val expiration_month = cardExpirationDateElement.month()
            val expiration_year = cardExpirationDateElement.year()
            val cvc = cardVerificationCodeElement
          }
          val fingerprint_expression = "{{ data.number }}"
        })
      }
    }
}
const App = (): JSX.Element => {
  const { bt } = useBasisTheory('<PUBLIC_API_KEY>', { 'environment': 'test'});
  ...
  const submit = async () => {
        try {
          const _token = await bt?.tokens.create({
            type: 'card',
            data: {
              number: cardNumberRef.current,
              expiration_month: cardExpirationDateRef.current?.month(),
              expiration_year: cardExpirationDateRef.current?.year(),
              cvc: cardVerificationCodeRef.current,
            },
            fingerprintExpression: '{{ data.number }}',
          });
        } catch (error) {
          console.error(error);
        }
      }
    return (...);
  };
The new tokens should now have a fingerprint:
{
  "id": "d2cbc1b4-5c3a-45a3-9ee2-392a1c475ab4",
  "type": "card",
  "tenant_id": "15f48eb5-8b52-4cdd-a396-608f7cf001d0",
  "data": {
    "number": "XXXXXXXXXXXX4242",
    "expiration_month": 12,
    "expiration_year": 2025
  },
  "created_by": "4a6ae2a6-79f8-4640-968f-88db913743df",
  "created_at": "2023-04-17T12:54:44.8320458+00:00",
  "fingerprint": "CC2XvyoohnqecEq4r3FtXv6MdCx4TbaW1UUTdCCN5MNL",
  "fingerprint_expression": "{{ data.number }}",
  "mask": {
    "number": "{{ data.number | reveal_last: 4 }}",
    "expiration_month": "{{ data.expiration_month }}",
    "expiration_year": "{{ data.expiration_year }}"
  },
  "search_indexes": [],
  "containers": [
    "/pci/high/"
  ]
}
If you want to prevent creation of a duplicate token based on the distinguishable fingerprint, add the flag below:
- JavaScript
- React
- iOS
- Android
- React Native
async function submit () {
  try {
    const token = await bt.tokens.create({
      type: 'card',
      data: {
        number: cardNumberElement,
        expiration_month: cardExpirationDateElement.month(),
        expiration_year: cardExpirationDateElement.year(),
        cvc: cardVerificationCodeElement,
      },
      fingerprintExpression: '{{ data.number }}',
      deduplicateToken: true,
    });
  } catch (error) {
    console.error(error);
  }
}
export default function App() {
  const submit = async () => {
    try {
      const token = await bt?.tokens.create({
        type: 'card',
        data: {
          number: cardNumberRef.current,
          expiration_month: cardExpirationRef.current.month(),
          expiration_year: cardExpirationRef.current.year(),
          cvc: cardVerificationRef.current,
        },
        fingerprintExpression: '{{ data.number }}',
        deduplicateToken: true,
      });
    } catch (error) {
      console.error(error);
    }
  }

  return (...);
}
class ViewController: UIViewController {
    @IBAction func submit(_ sender: Any) {
        let body: [String: Any] = [
            "type": "card",
            "data": [
                "number": self.cardNumberTextField,
                "expiration_month": self.expirationDateTextField.month(),
                "expiration_year": self.expirationDateTextField.year(),
                "cvc": self.cvcTextField
            ],
            "fingerprint_expression": "{{ data.number }}",
            "deduplicate_token": true
        ]

        BasisTheoryElements.tokenize(body: body, apiKey: "<API_KEY>") { token, error in
            guard error == nil else {
                print(error)
                return
            }
        }
    }
}
class MainActivity : AppCompatActivity() {

    private fun submit() {
      val token = runBlocking {
        bt.tokens.create(object {
          val type = "card"
          val data = object {
            val number = cardNumberElement
            val expiration_month = cardExpirationDateElement.month()
            val expiration_year = cardExpirationDateElement.year()
            val cvc = cardVerificationCodeElement
          }
          val fingerprint_expression = "{{ data.number }}"
          val deduplicate_token = true
        })
      }
    }
}
const App = (): JSX.Element => {
  const { bt } = useBasisTheory('<PUBLIC_API_KEY>', { 'environment': 'test'});
  ...
  const submit = async () => {
        try {
          const _token = await bt?.tokens.create({
            type: 'card',
            data: {
              number: cardNumberRef.current,
              expiration_month: cardExpirationDateRef.current?.month(),
              expiration_year: cardExpirationDateRef.current?.year(),
              cvc: cardVerificationCodeRef.current,
            },
            fingerprintExpression: '{{ data.number }}',
            deduplicateToken: true,
          });
        } catch (error) {
          console.error(error);
        }
      }
    return (...);
  };
By doing the above, you are instructing Basis Theory to return the existing token if it is found to have the same fingerprint. Click here to learn more about token deduplication.
Masking
By default, card tokens are created with a mask revealing only the last 4 digits of the card number. This is useful for generating receipts and payment history, displaying the card to the end-user without revealing the full number, etc.
In other scenarios, being able to preserve the Bank Identification Number (BIN) from the card number can enable fraud detection mechanisms, advanced payment processing routing, account type differentiation and other core functionality. PCI DSS allows applications to reveal up to the first 8 and last 4 digits of a card number, depending on its length and Payment Brand. Luckily, when creating a token, you can express which segments of the PAN are useful to you with a single expressions filter: card_mask. Click here to learn more about this filter.
- JavaScript
- React
- iOS
- Android
- React Native
async function submit () {
  try {
    const token = await bt.tokens.create({
      type: 'card',
      data: {
        number: cardNumberElement,
        expiration_month: cardExpirationDateElement.month(),
        expiration_year: cardExpirationDateElement.year(),
        cvc: cardVerificationCodeElement,
      },
      fingerprintExpression: '{{ data.number }}',
      deduplicateToken: true,
      mask: {
        number:'{{ data.number | card_mask: "true", "true" }}',
        expiration_month: '{{ data.expiration_month }}',
        expiration_year: '{{ data.expiration_year }}',
      },
    });
  } catch (error) {
    console.error(error);
  }
}
export default function App() {
  const submit = async () => {
    try {
      const token = await bt?.tokens.create({
        type: 'card',
        data: {
          number: cardNumberRef.current,
          expiration_month: cardExpirationRef.current.month(),
          expiration_year: cardExpirationRef.current.year(),
          cvc: cardVerificationRef.current,
        },
        fingerprintExpression: '{{ data.number }}',
        deduplicateToken: true,
        mask: {
          number:'{{ data.number | card_mask: "true", "true" }}',
          expiration_month: '{{ data.expiration_month }}',
          expiration_year: '{{ data.expiration_year }}',
        },
      });
    } catch (error) {
      console.error(error);
    }
  }

  return (...);
}
class ViewController: UIViewController {
    @IBAction func submit(_ sender: Any) {
        let body: [String: Any] = [
            "type": "card",
            "data": [
                "number": self.cardNumberTextField,
                "expiration_month": self.expirationDateTextField.month(),
                "expiration_year": self.expirationDateTextField.year(),
                "cvc": self.cvcTextField
            ],
            "fingerprint_expression": "{{ data.number }}",
            "deduplicate_token": true,
            "mask": [
                "number": "{{ data.number | card_mask: 'true', 'true' }}",
                "expiration_month": "{{ data.expiration_month }}",
                "expiration_year": "{{ data.expiration_year }}"
            ],
        ]

        BasisTheoryElements.tokenize(body: body, apiKey: "<API_KEY>") { token, error in
            guard error == nil else {
                print(error)
                return
            }
        }
    }
}
class MainActivity : AppCompatActivity() {

    private fun submit() {
      val token = runBlocking {
        bt.tokens.create(object {
          val type = "card"
          val data = object {
            val number = cardNumberElement
            val expiration_month = cardExpirationDateElement.month()
            val expiration_year = cardExpirationDateElement.year()
            val cvc = cardVerificationCodeElement
          }
          val fingerprint_expression = "{{ data.number }}"
          val deduplicate_token = true
          val mask = object {
            val number = "{{ data.number | card_mask: 'true', 'true' }}"
            val expiration_month = "{{ data.expiration_month }}"
            val expiration_year = "{{ data.expiration_year }}"
          }
        })
      }
    }
}
const App = (): JSX.Element => {
  const { bt } = useBasisTheory('<PUBLIC_API_KEY>', { 'environment': 'test'});
  ...
  const submit = async () => {
        try {
          const _token = await bt?.tokens.create({
            type: 'card',
            data: {
              number: cardNumberRef.current,
              expiration_month: cardExpirationDateRef.current?.month(),
              expiration_year: cardExpirationDateRef.current?.year(),
              cvc: cardVerificationCodeRef.current,
            },
            fingerprintExpression: '{{ data.number }}',
            deduplicateToken: true,
            mask: {
              number:'{{ data.number | card_mask: "true", "true" }}',
              expiration_month: '{{ data.expiration_month }}',
              expiration_year: '{{ data.expiration_year }}',
            },
          });
        } catch (error) {
          console.error(error);
        }
      }
    return (...);
  };
Now, the created token should also reveal the BIN:
{
  "id": "d2cbc1b4-5c3a-45a3-9ee2-392a1c475ab4",
  "type": "card",
  "tenant_id": "15f48eb5-8b52-4cdd-a396-608f7cf001d0",
  "data": {
    "number": "42424242XXXX4242",
    "expiration_month": 12,
    "expiration_year": 2025
  },
  "created_by": "4a6ae2a6-79f8-4640-968f-88db913743df",
  "created_at": "2023-04-17T12:54:44.8320458+00:00",
  "fingerprint": "CC2XvyoohnqecEq4r3FtXv6MdCx4TbaW1UUTdCCN5MNL",
  "fingerprint_expression": "{{ data.number }}",
  "mask": {
    "number": "{{ data.number | card_mask: 'true', 'true' }}",
    "expiration_month": "{{ data.expiration_month }}",
    "expiration_year": "{{ data.expiration_year }}"
  },
  "search_indexes": [],
  "containers": [
    "/pci/high/"
  ]
}
In the example above, we instruct Basis Theory to reveal both segments, without having to worry about the card brand or number length. Click here to learn more about Masking.
Aliasing
While storing or transmitting tokens between systems, you may encounter restrictive technical constraints that can draw the default token Universally Unique Identifier (UUID) incompatible.
In the example below, we will pass a predefined token id that follows a custom logic, which resembles an alternative format used in the payments industry. This capability enables Token Portability, and it can be specially useful in migration scenarios.
- JavaScript
- React
- iOS
- Android
- React Native
function generateTokenId() {
  const chars = 'ABCDEFGHIJKLMNOPQRSTUVWXYZabcdefghijklmnopqrstuvwxyz0123456789';
  let tokenId = 'card_';
  for (let i = 0; i < 24; i++) {
    tokenId += chars.charAt(Math.floor(Math.random() * chars.length));
  }
  return tokenId;
}

async function submit () {
  try {
    const token = await bt.tokens.create({
      id: generateTokenId(),
      type: 'card',
      data: {
        number: cardNumberElement,
        expiration_month: cardExpirationDateElement.month(),
        expiration_year: cardExpirationDateElement.year(),
        cvc: cardVerificationCodeElement,
      },
      fingerprintExpression: '{{ data.number }}',
      deduplicateToken: true,
      mask: {
        number:'{{ data.number | card_mask: "true", "true" }}',
        expiration_month: '{{ data.expiration_month }}',
        expiration_year: '{{ data.expiration_year }}',
      },
    });
  } catch (error) {
    console.error(error);
  }
}
const generateTokenId = () => {
  const chars = 'ABCDEFGHIJKLMNOPQRSTUVWXYZabcdefghijklmnopqrstuvwxyz0123456789';
  let tokenId = 'card_';
  for (let i = 0; i < 24; i++) {
    tokenId += chars.charAt(Math.floor(Math.random() * chars.length));
  }
  return tokenId;
}

export default function App() {
  const submit = async () => {
    try {
      const token = await bt?.tokens.create({
        id: generateTokenId(),
        type: 'card',
        data: {
          number: cardNumberRef.current,
          expiration_month: cardExpirationRef.current.month(),
          expiration_year: cardExpirationRef.current.year(),
          cvc: cardVerificationRef.current,
        },
        fingerprintExpression: '{{ data.number }}',
        deduplicateToken: true,
        mask: {
          number:'{{ data.number | card_mask: "true", "true" }}',
          expiration_month: '{{ data.expiration_month }}',
          expiration_year: '{{ data.expiration_year }}',
        },
      });
    } catch (error) {
      console.error(error);
    }
  }

  return (...);
}
class ViewController: UIViewController {
    func generateTokenId() -> String {
        let chars = "ABCDEFGHIJKLMNOPQRSTUVWXYZabcdefghijklmnopqrstuvwxyz0123456789"
        var tokenId = "card_"
        for _ in 1...24 {
            let randomIndex = Int(arc4random_uniform(UInt32(chars.count)))
            let randomChar = chars[chars.index(chars.startIndex, offsetBy: randomIndex)]
            tokenId.append(randomChar)
        }
        return tokenId
    }

    @IBAction func submit(_ sender: Any) {
        let body: [String: Any] = [
            "id": generateTokenId(),
            "type": "card",
            "data": [
                "number": self.cardNumberTextField,
                "expiration_month": self.expirationDateTextField.month(),
                "expiration_year": self.expirationDateTextField.year(),
                "cvc": self.cvcTextField
            ],
            "fingerprint_expression": "{{ data.number }}",
            "deduplicate_token": true,
            "mask": [
                "number": "{{ data.number | card_mask: 'true', 'true' }}",
                "expiration_month": "{{ data.expiration_month }}",
                "expiration_year": "{{ data.expiration_year }}"
            ],
        ]

        BasisTheoryElements.tokenize(body: body, apiKey: "<API_KEY>") { token, error in
            guard error == nil else {
                print(error)
                return
            }
        }
    }
}
class MainActivity : AppCompatActivity() {
    fun generateTokenId(): String {
      val allowedChars = ('A'..'Z') + ('a'..'z') + ('0'..'9')
      val tokenId = StringBuilder("card_")
      repeat(24) {
        tokenId.append(allowedChars.random())
      }
      return tokenId.toString()
    }

    private fun submit() {
      val token = runBlocking {
        bt.tokens.create(object {
          val id = this.generateTokenId()
          val type = "card"
          val data = object {
            val number = cardNumberElement
            val expiration_month = cardExpirationDateElement.month()
            val expiration_year = cardExpirationDateElement.year()
            val cvc = cardVerificationCodeElement
          }
          val fingerprint_expression = "{{ data.number }}"
          val deduplicate_token = true
          val mask = object {
            val number = "{{ data.number | card_mask: 'true', 'true' }}"
            val expiration_month = "{{ data.expiration_month }}"
            val expiration_year = "{{ data.expiration_year }}"
          }
        })
      }
    }
}
  function generateTokenId() {
    const chars = 'ABCDEFGHIJKLMNOPQRSTUVWXYZabcdefghijklmnopqrstuvwxyz0123456789';
    let tokenId = 'card_';
    for (let i = 0; i < 24; i++) {
      tokenId += chars.charAt(Math.floor(Math.random() * chars.length));
    }
    return tokenId;
  }

const App = (): JSX.Element => {
  const { bt } = useBasisTheory('<PUBLIC_API_KEY>', { 'environment': 'test'});
  ...
  const submit = async () => {
        try {
          const _token = await bt?.tokens.create({
            id: generateTokenId(),
            type: 'card',
            data: {
              number: cardNumberRef.current,
              expiration_month: cardExpirationDateRef.current?.month(),
              expiration_year: cardExpirationDateRef.current?.year(),
              cvc: cardVerificationCodeRef.current,
            },
            fingerprintExpression: '{{ data.number }}',
            deduplicateToken: true,
            mask: {
              number:'{{ data.number | card_mask: "true", "true" }}',
              expiration_month: '{{ data.expiration_month }}',
              expiration_year: '{{ data.expiration_year }}',
            },
          });
        } catch (error) {
          console.error(error);
        }
      }
    return (...);
  };
The returned token object should now have a custom identifier:
{
  "id": "card_1Mxqr82eZvKYlo2CSaatci3m",
  "type": "card",
  "tenant_id": "15f48eb5-8b52-4cdd-a396-608f7cf001d0",
  "data": {
    "number": "42424242XXXX4242",
    "expiration_month": 12,
    "expiration_year": 2025
  },
  "created_by": "4a6ae2a6-79f8-4640-968f-88db913743df",
  "created_at": "2023-04-17T12:54:44.8320458+00:00",
  "fingerprint": "CC2XvyoohnqecEq4r3FtXv6MdCx4TbaW1UUTdCCN5MNL",
  "fingerprint_expression": "{{ data.number }}",
  "mask": {
    "number": "{{ data.number | card_mask: 'true', 'true' }}",
    "expiration_month": "{{ data.expiration_month }}",
    "expiration_year": "{{ data.expiration_year }}"
  },

  "search_indexes": [],
  "containers": [
    "/pci/high/"
  ]
}
Similarly to masking, aliasing also supports passing custom data-bound expressions, that can generate length and format-preserving token identifiers. Doing such increases compatibility to store or pass tokens between systems, white preserving information about the tokenized data.
For example, use the alias_card filter to generate a synthetic card number as a token identifier, which shares the same BIN and last four digits of the real card number. Click here to learn more about Aliasing.
Conclusion
The best practices prescribed in this guide ensure that your user-facing applications are compliant with the PCI-DSS standards and your users' sensitive card data is protected. The token.id obtained at the end of the Storing Cards section is a synthetic replacement for the sensitive data and can be safely stored in your database, or transmitted through your systems, meeting compliance requirements and reducing the risk of exposure in case of data breaches.
The optional customization steps are meant to showcase platform capabilities that go beyond the examples given. Make sure to explore the provided links within each subsection to learn more about the possibilities for customization.
For next steps, take a look at the following guides to proceed taking the most value of your secured card tokens: