Issue and Display Credit Cards
This blueprint provides a complete end-to-end guide on how to issue and reveal credit card data securely using Basis Theory and a third-party card issuer without touching the data.
For this blueprint, we are going to use iOS as our client application and Express.Js for our backend, but the blueprint can be modified for your specific framework or language by leveraging any one of our many language-specific SDKs.
This blueprint is a more end-to-end version of the following two guides:
- Reveal Tokenized Data - For revealing tokenized data such as the card PAN and expiration date.
- Reveal Data from Third Party - For revealing the CVC from a card issue such as Lithic or Marqeta.
You can find examples for other languages and frameworks inside those guides.
Getting Started
To get started, you will need a Basis Theory account.
Creating a Public Application
Next you will need a Public Application in order to create tokens, sessions and initialize our Elements libraries.
Click here to create a Public Application or login to your Basis Theory account and create a new application with the following settings:
- Name - Public App
- Application Type - Public
- Permissions -
token:create
Vault Newly Created Cards
When a new card is issued with your system, you'll want to vault this with Basis Theory to later reveal it and perhaps process or share it.
In order to vault these newly created cards, follow this guide.
Setting Up the Project
We will create a new iOS application through Xcode. If you don't have Xcode, download it through the Mac App Store.
-
Launch Xcode, then click “Create a new Xcode project”. In the window that appears, select "iOS" for the target operating system and the "App" template under Application, then click Next.
-
For the Product Name enter "Reveal iOS Guide", and for the Organization enter your own name. Ensure StoryBoard and Swift are selected for the Interface and Language, then click Next.
-
On the next screen save the project, wherever you'd like.
This will launch Xcode with the newly created project.
Installing the iOS Elements SDK
We will need to install Basis Theory's iOS Elements SDK, which will render secure UITextFields for revealing the card data.
With the Xcode window in focus, select File > Add Packages. In the dialog that appears, enter https://github.com/Basis-Theory/ios-elements in the search field on the top right, then click Add Package on this screen and the next prompts.
Adding Your Form Components
For a complete card, we will need to add three iOS elements to our app:
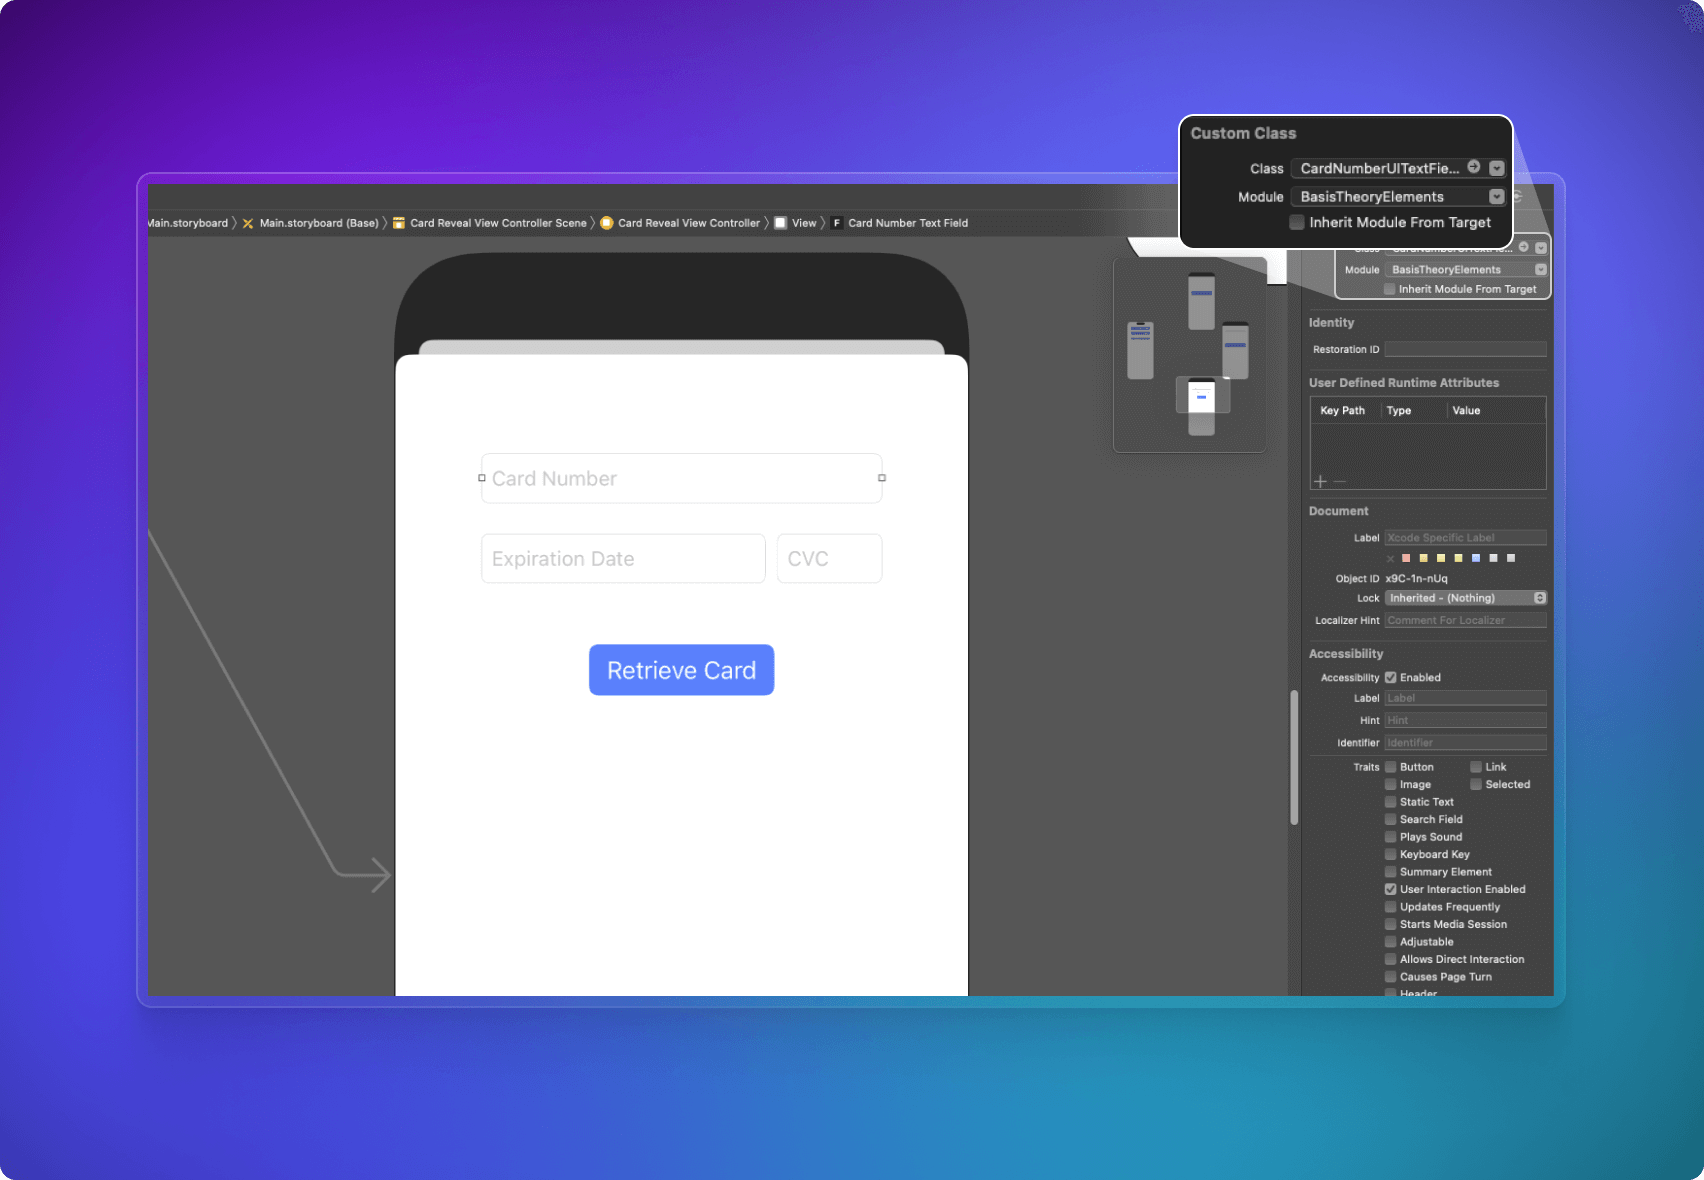
The easiest way to add any of our iOS elements is to first drop a UITextField onto your Main.storyboard file. To do this open the Main.storyboard file, and click on plus button on the top right and search for "UITextField" in
the dialog that appears. Now drag and drop the Text Field component anywhere on the iPhone screen. Feel free to size the UITextField to your liking.
With the new UITextField selected, open up the Identity Inspector on the right and select CardNumberUITextField, CardExpirationDateUITextField or CardVerificationCodeUITextField accordingly from the class drop down, similar to the image below.
Repeat this process until you have a form component for each of the three iOS card elements.
Styling Your Form Components
Now it's time to style our new card text fields. We'll be styling our elements programmatically, but feel free to style it through the GUI on Xcode, or even try implementing your own styles!
First we need to add an outlet to our ViewController.swift for each field so that we're able to manipulate them programmatically. To do this, ensure your Main.storyboard file is open and click on the "Add Editor to the Right" button
on the top right. Here's a helpful image below:

Clicking on the button above will open the Main.storyboard on a new pane on the right. Now in the Project Navigator on the left, click on the ViewController.swift file. This should replace the Main.storyboard file on the right pane.
Next, we control-drag from each of CardNumberUITextField, CardExpirationDateUITextField and CardVerificationCodeUITextField in Main.storyboard to the top of our ViewController class in the ViewController.swift file on the right.
In the window that appears, type in "cardNumberElement", "cardExpirationDateElement" and "cardVerificationCodeElement" respectively for the Name of each element and click Connect. Then Xcode should suggest you import BasisTheoryElements, so let's go ahead and do that now.
You should have something similar to the following for ViewController.swift after these steps.
import UIKit
import BasisTheoryElements

class ViewController: UIViewController {
    @IBOutlet weak var cardNumberElement: CardNumberUITextField!
    @IBOutlet weak var cardExpirationDateElement: CardExpirationDateUITextField!
    @IBOutlet weak var cardVerificationCodeElement: CardVerificationCodeUITextField!

    override func viewDidLoad() {
        super.viewDidLoad()
        // Do any additional setup after loading the view.
    }
}
We'll use the new cardNumberElement, cardExpirationDateElement and cardVerificationCodeElement outlets to style our new elements. Let's write some statements to style our form.
import UIKit
import BasisTheoryElements

class ViewController: UIViewController {
    @IBOutlet weak var cardNumberElement: CardNumberUITextField!
    @IBOutlet weak var cardExpirationDateElement: CardExpirationDateUITextField!
    @IBOutlet weak var cardVerificationCodeElement: CardVerificationCodeUITextField!

    override func viewDidLoad() {
        super.viewDidLoad()
        // Do any additional setup after loading the view.

        cardNumberElement.layer.borderWidth = 1.0
        cardNumberElement.placeholder = "Card Number"
        cardNumberElement.backgroundColor = UIColor( red: 200/255, green: 200/255, blue: 200/255, alpha: 1.0 )

        cardExpirationDateElement.layer.borderWidth = 1.0
        cardExpirationDateElement.placeholder = "Expiration Date"
        cardExpirationDateElement.backgroundColor = UIColor( red: 200/255, green: 200/255, blue: 200/255, alpha: 1.0 )

        cardVerificationCodeElement.layer.borderWidth = 1.0
        cardVerificationCodeElement.placeholder = "CVC"
        cardVerificationCodeElement.backgroundColor = UIColor( red: 200/255, green: 200/255, blue: 200/255, alpha: 1.0 )
    }
}
As you can see above, we take advantage of the existing UITextField API to style our component. All of our iOS elements extend UITextField for ease of use and speed to production.
Creating a Session
Next, we'll create a Session. Sessions provide temporary elevated access to your public applications, and we'll use it to safely retrieve the data from the token and to invoke a proxy to an issuer.
As creating a session is part of the lifecycle of revealing a token value safely, we need to add a reveal UIButton and a function to handle all steps for revealing, including creating the session.
Open the Main.storyboard file, and click on the plus button on the top right and search for "UIButton" in the dialog that appears and drag
and drop the Filled Button component anywhere under our form elements. Let's change the name of this button to "Reveal" by double-clicking on the new UIButton.
Now we need to add an action for this new button. Follow the previous steps from Styling Your Form Components to get Main.storyboard and ViewController.swift files side-by-side. Control-drag
the "Reveal" UIButton into ViewController.swift, then choose Action for the Connection and "reveal" for the Name.
Now we'll add the following code to our iOS app to create a session and retrieve the sessionKey and nonce from it.
import UIKit
import BasisTheoryElements

class ViewController: UIViewController {
    @IBOutlet weak var cardNumberElement: CardNumberUITextField!
    @IBOutlet weak var cardExpirationDateElement: CardExpirationDateUITextField!
    @IBOutlet weak var cardVerificationCodeElement: CardVerificationCodeUITextField!

    @IBAction func reveal(_ sender: Any) {
        BasisTheoryElements.createSession(apiKey: "<API_KEY>") { data, error in
            let sessionKey = data!.sessionKey!
            let nonce = data!.nonce!

        }
    }

    override func viewDidLoad() {
        super.viewDidLoad()
        // Do any additional setup after loading the view.

        cardNumberElement.layer.borderWidth = 1.0
        cardNumberElement.placeholder = "Card Number"
        cardNumberElement.backgroundColor = UIColor( red: 200/255, green: 200/255, blue: 200/255, alpha: 1.0 )

        cardExpirationDateElement.layer.borderWidth = 1.0
        cardExpirationDateElement.placeholder = "Expiration Date"
        cardExpirationDateElement.backgroundColor = UIColor( red: 200/255, green: 200/255, blue: 200/255, alpha: 1.0 )

        cardVerificationCodeElement.layer.borderWidth = 1.0
        cardVerificationCodeElement.placeholder = "CVC"
        cardVerificationCodeElement.backgroundColor = UIColor( red: 200/255, green: 200/255, blue: 200/255, alpha: 1.0 )
    }
}
<API_KEY> with the Public API Key you created in the Getting Started step.Authorizing a Session
In order to use the session to retrieve data, we need to authorize it with a Private Application.
Creating a Private Application
First, lets create the Private Application. To do so, Login to your Basis Theory account and create a new application with the following settings:
- Name - Reveal Cards
- Application Type - Private
- Access Rule (Use the
Advanced Rule Builderoption)- Description - Reveal Cards
- Container -
/pci/ - Permissions -
token:readandtoken:use - Transform -
reveal
Authorizing in the Backend
A session needs to be authorized by a Private Application first before usage.
Using the Private Application API Key, the nonce from our session, and Condition we ensure we are only granting authorization for the desired token.
For this example, we will use Express.js as our backend and the Node.js SDK to authorize the session.
We'll create a backend.js file and add the following code to start the Express.js backend and authorize an incoming session.
const express = require("express");
const { BasisTheoryClient } = require("@basis-theory/node-sdk");

const app = express();
const port = 4242;

app.post("/authorize", async (request, response) => {
    const bt = await new BasisTheoryClient({ apiKey: "<PRIVATE_API_KEY>", environment: BasisTheoryEnvironment.Test });
    const { nonce } = request.body;
    // authorizing a session returns an empty 200 response
    await bt.sessions.authorize({
        nonce: nonce,
        rules: [
            {
                description: "Reveal only our Card Token",
                priority: 1,
                conditions: [
                    {
                        attribute: "id",
                        operator: "equals",
                        value: "token_id_1234567890",
                    },
                ],
                permissions: ["token:read", "token:use"],
                transform: "reveal",
            },
        ],
    });
    // this response is arbitrary and not required
    response.json({
        result: "success",
    });
});
app.listen(port, () => {
    console.log(`Example app listening on port ${port}`);
});
Now we can start the server with the following command (from the same directory as backend.js).
node backend.js
<PRIVATE_API_KEY> with the Private API Key you created in Creating a Private Application and token_id_1234567890 with the id for the card token you wish to reveal.Calling the Authorization Endpoint
Now with our backend running, we'll add the following code to call the authorization endpoint, passing our created session nonce to it:
import UIKit
import BasisTheoryElements

class ViewController: UIViewController {
    @IBOutlet weak var cardNumberElement: CardNumberUITextField!
    @IBOutlet weak var cardExpirationDateElement: CardExpirationDateUITextField!
    @IBOutlet weak var cardVerificationCodeElement: CardVerificationCodeUITextField!

    func authorizeSession(nonce: String, completion: @escaping ([String: Any]?, Error?) -> Void) {
        let parameters = ["nonce": nonce]

        let url = URL(string: "http://localhost:4242/authorize")!
        let session = URLSession.shared

        var request = URLRequest(url: url)
        request.httpMethod = "POST"

        do {
            request.httpBody = try JSONSerialization.data(withJSONObject: parameters, options: .prettyPrinted)
        } catch let error {
            completion(nil, error)
        }

        request.addValue("application/json", forHTTPHeaderField: "Content-Type")
        request.addValue("application/json", forHTTPHeaderField: "Accept")

        let task = session.dataTask(with: request, completionHandler: { data, response, error in
            guard error == nil else {
                completion(nil, error)
                return
            }

            do {
                let json = try JSONSerialization.jsonObject(with: data!, options: .mutableContainers) as? [String: Any]
                completion(json, nil)
            } catch let error {
                completion(nil, error)
            }
        })

        task.resume()
    }

    @IBAction func reveal(_ sender: Any) {
        BasisTheoryElements.createSession(apiKey: "<API_KEY>") { data, error in
            let sessionKey = data!.sessionKey!
            let nonce = data!.nonce!

            self.authorizeSession(nonce: nonce) { result, error in

            }
        }
    }

    override func viewDidLoad() {
        super.viewDidLoad()
        // Do any additional setup after loading the view.

        cardNumberElement.layer.borderWidth = 1.0
        cardNumberElement.placeholder = "Card Number"
        cardNumberElement.backgroundColor = UIColor( red: 200/255, green: 200/255, blue: 200/255, alpha: 1.0 )

        cardExpirationDateElement.layer.borderWidth = 1.0
        cardExpirationDateElement.placeholder = "Expiration Date"
        cardExpirationDateElement.backgroundColor = UIColor( red: 200/255, green: 200/255, blue: 200/255, alpha: 1.0 )

        cardVerificationCodeElement.layer.borderWidth = 1.0
        cardVerificationCodeElement.placeholder = "CVC"
        cardVerificationCodeElement.backgroundColor = UIColor( red: 200/255, green: 200/255, blue: 200/255, alpha: 1.0 )
    }
}
Revealing a Card Token
With the authorized session, we can now use the sessionKey to retrieve the card token from the Basis Theory backend.
We'll add the following code to retrieve the token and set its values to the individual card elements.
import UIKit
import BasisTheoryElements

class ViewController: UIViewController {
    @IBOutlet weak var cardNumberElement: CardNumberUITextField!
    @IBOutlet weak var cardExpirationDateElement: CardExpirationDateUITextField!
    @IBOutlet weak var cardVerificationCodeElement: CardVerificationCodeUITextField!

    func authorizeSession(nonce: String, completion: @escaping ([String: Any]?, Error?) -> Void) {
        let parameters = ["nonce": nonce]

        let url = URL(string: "http://localhost:4242/authorize")!
        let session = URLSession.shared

        var request = URLRequest(url: url)
        request.httpMethod = "POST"

        do {
            request.httpBody = try JSONSerialization.data(withJSONObject: parameters, options: .prettyPrinted)
        } catch let error {
            completion(nil, error)
        }

        request.addValue("application/json", forHTTPHeaderField: "Content-Type")
        request.addValue("application/json", forHTTPHeaderField: "Accept")

        let task = session.dataTask(with: request, completionHandler: { data, response, error in
            guard error == nil else {
                completion(nil, error)
                return
            }

            do {
                let json = try JSONSerialization.jsonObject(with: data!, options: .mutableContainers) as? [String: Any]
                completion(json, nil)
            } catch let error {
                completion(nil, error)
            }
        })

        task.resume()
    }

    @IBAction func reveal(_ sender: Any) {
        BasisTheoryElements.createSession(apiKey: "<API_KEY>") { data, error in
            let sessionKey = data!.sessionKey!
            let nonce = data!.nonce!

            self.authorizeSession(nonce: nonce) { result, error in
                BasisTheoryElements.getTokenById(id: "card_token_id", apiKey: sessionKey) { data, error in
                  DispatchQueue.main.async {
                    self.cardNumberElement.setValue(elementValueReference: data!.data!.number!.elementValueReference)

                    self.cardExpirationDateElement.setValue(
                        month: data!.data!.expiration_month!.elementValueReference,
                        year: data!.data!.expiration_year!.elementValueReference
                    )
                  }
                }
            }
        }
    }

    override func viewDidLoad() {
        super.viewDidLoad()
        // Do any additional setup after loading the view.

        cardNumberElement.layer.borderWidth = 1.0
        cardNumberElement.placeholder = "Card Number"
        cardNumberElement.backgroundColor = UIColor( red: 200/255, green: 200/255, blue: 200/255, alpha: 1.0 )

        cardExpirationDateElement.layer.borderWidth = 1.0
        cardExpirationDateElement.placeholder = "Expiration Date"
        cardExpirationDateElement.backgroundColor = UIColor( red: 200/255, green: 200/255, blue: 200/255, alpha: 1.0 )

        cardVerificationCodeElement.layer.borderWidth = 1.0
        cardVerificationCodeElement.placeholder = "CVC"
        cardVerificationCodeElement.backgroundColor = UIColor( red: 200/255, green: 200/255, blue: 200/255, alpha: 1.0 )
    }
}
Revealing CVC from Issuer
Card verification codes collected with Basis Theory are expunged from the platform 1 hour after its creation due to security and compliance reasons. In order to show the CVC number to a customer, we can use the Basis Theory Proxy to proxy a call to the card issuer (in this blueprint, Lithic) and retrieve the CVC safely and in compliance.
Creating a Management Application
To create a proxy, you will need a Management Application.
Click here to create a Management Application or login to your Basis Theory account and create a new application with the following settings:
- Name - Create Proxy
- Application Type - Management
- Permissions:
proxy:create
Creating a Proxy to Lithic
A proxy can be created using one of our SDKs or through our API. In the example below we'll continue to use our Express.js backend. Notice that we are using a request transform to add our Lithic API key to the header on every proxy request.
const express = require("express");
const { BasisTheoryClient } = require("@basis-theory/node-sdk");

const app = express();
const port = 4242;

app.post("/authorize", async (request, response) => {
    const bt = await new BasisTheoryClient({ apiKey: "<PRIVATE_API_KEY>", environment: BasisTheoryEnvironment.Test });
    const { nonce } = request.body;
    // authorizing a session returns an empty 200 response
    await bt.sessions.authorize({
        nonce: nonce,
        rules: [
            {
                description: "Reveal only our Card Token",
                priority: 1,
                conditions: [
                    {
                        attribute: "id",
                        operator: "equals",
                        value: "token_id_1234567890",
                    },
                ],
                permissions: ["token:read", "token:use"],
                transform: "reveal",
            },
        ],
    });
    // this response is arbitrary and not required
    response.json({
        result: "success",
    });
});

// TODO - CONFIGURATION
app.post("/create-proxy", async (request, response) => {
  const bt = await new BasisTheoryClient({ apiKey: "<MANAGEMENT_API_KEY>" });
  const proxy = await bt.proxies.create(
    {
      name: "Reveal Cards Proxy",
      destinationUrl: "https://sandbox.lithic.com/v1/cards",
      requestTransform: {
        code: `module.exports = async function (req) {
          let { args: { body, headers }, bt } = req;

          return {
              body,
              headers: {
                ...headers,
                "Authorization": "lithic_key_123456789"
              },
          }
        };`,
      },
      requireAuth: true,
    }
  );

  response.send(proxy);
});

app.listen(port, () => {
    console.log(`Example app listening on port ${port}`);
});
You can now use your favorite API client or just run the following curl command from your terminal:
curl -X POST http://localhost:4242/create-proxy
<MANAGEMENT_API_KEY> with the Management API Key you created in Creating a Management Application, and lithic_key_123456789 with your Lithic API Key.key value returned from the proxy as its going to be used in the next step.destinationUrl to the production url: https://api.lithic.com/v1/cardsRetrieving and Revealing CVC Value from Lithic
With the proxy created, we'll add the following code to call it using our previously authorized sessionKey, retrieve the CVC number, and then set it onto our element.
import UIKit
import BasisTheoryElements

class ViewController: UIViewController {
    @IBOutlet weak var cardNumberElement: CardNumberUITextField!
    @IBOutlet weak var cardExpirationDateElement: CardExpirationDateUITextField!
    @IBOutlet weak var cardVerificationCodeElement: CardVerificationCodeUITextField!

    func authorizeSession(nonce: String, completion: @escaping ([String: Any]?, Error?) -> Void) {
        let parameters = ["nonce": nonce]

        let url = URL(string: "http://localhost:4242/authorize")!
        let session = URLSession.shared

        var request = URLRequest(url: url)
        request.httpMethod = "POST"

        do {
            request.httpBody = try JSONSerialization.data(withJSONObject: parameters, options: .prettyPrinted)
        } catch let error {
            completion(nil, error)
        }

        request.addValue("application/json", forHTTPHeaderField: "Content-Type")
        request.addValue("application/json", forHTTPHeaderField: "Accept")

        let task = session.dataTask(with: request, completionHandler: { data, response, error in
            guard error == nil else {
                completion(nil, error)
                return
            }

            do {
                let json = try JSONSerialization.jsonObject(with: data!, options: .mutableContainers) as? [String: Any]
                completion(json, nil)
            } catch let error {
                completion(nil, error)
            }
        })

        task.resume()
    }

    @IBAction func reveal(_ sender: Any) {
        BasisTheoryElements.createSession(apiKey: "<API_KEY>") { data, error in
            let sessionKey = data!.sessionKey!
            let nonce = data!.nonce!

            self.authorizeSession(nonce: nonce) { result, error in
                BasisTheoryElements.getTokenById(id: "card_token_id", apiKey: sessionKey) { data, error in
                  DispatchQueue.main.async {
                    self.cardNumberElement.setValue(elementValueReference: data!.data!.number!.elementValueReference)

                    self.cardExpirationDateElement.setValue(
                        month: data!.data!.expiration_month!.elementValueReference,
                        year: data!.data!.expiration_year!.elementValueReference
                    )
                  }

                  let lithicCardTokenPath = "/lithic_token_id"
                  let proxyKey = "test_proxy_123456789"
                  let proxyHttpRequest = ProxyHttpRequest(method: .get, path: lithicCardTokenPath)
                  BasisTheoryElements.proxy(
                      apiKey: sessionKey,
                      proxyKey: proxyKey,
                      proxyHttpRequest: proxyHttpRequest)
                  { response, data, error in
                    DispatchQueue.main.async {
                      self.cvcTextField.setValue(elementValueReference: data!.cvv!.elementValueReference)
                    }
                  }
                }
            }
        }
    }

    override func viewDidLoad() {
        super.viewDidLoad()
        // Do any additional setup after loading the view.

        cardNumberElement.layer.borderWidth = 1.0
        cardNumberElement.placeholder = "Card Number"
        cardNumberElement.backgroundColor = UIColor( red: 200/255, green: 200/255, blue: 200/255, alpha: 1.0 )

        cardExpirationDateElement.layer.borderWidth = 1.0
        cardExpirationDateElement.placeholder = "Expiration Date"
        cardExpirationDateElement.backgroundColor = UIColor( red: 200/255, green: 200/255, blue: 200/255, alpha: 1.0 )

        cardVerificationCodeElement.layer.borderWidth = 1.0
        cardVerificationCodeElement.placeholder = "CVC"
        cardVerificationCodeElement.backgroundColor = UIColor( red: 200/255, green: 200/255, blue: 200/255, alpha: 1.0 )
    }
}
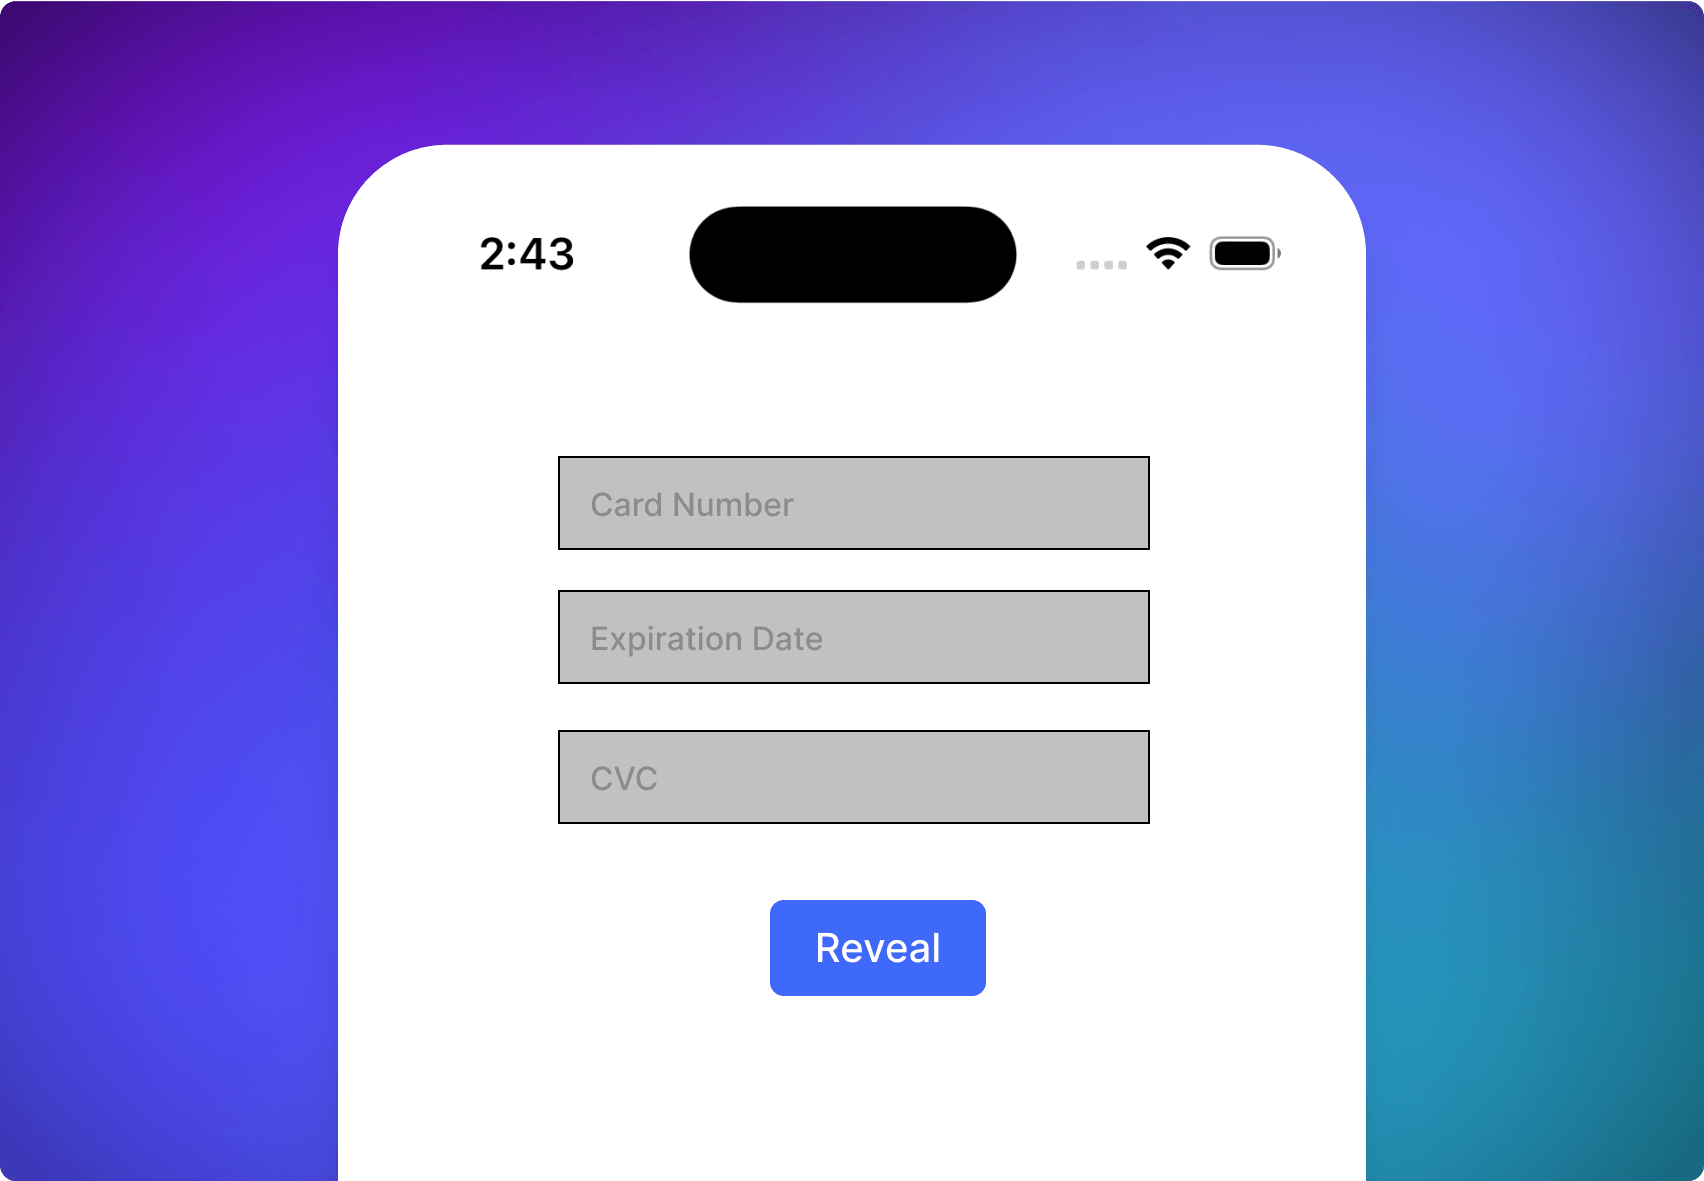
lithic_token_id with the ID for the Lithic card id, test_proxy_123456789 with the proxy key created in the Creating a Proxy to Lithic step and card_token_id with your Basis Theory card token id.🎉 The code above is the last bit that we need to reveal a full credit card! Now let's run the app by clicking on the play button on the top left. The screen should look something like this:
Conclusion
You can now reveal any data to a customer without your iOS app accessing the underlying value, reducing compliance and regulatory scope.
Try to tap the Reveal button and watch the card values appear on screen.
Have feedback or questions? Join us in our Slack community.