Accept Apple Pay Payments
This guide explains how to accept Apple Pay payments using the Basis Theory platform to handle PCI-sensitive data securely. Let’s begin by reviewing the Apple Pay payment flow.
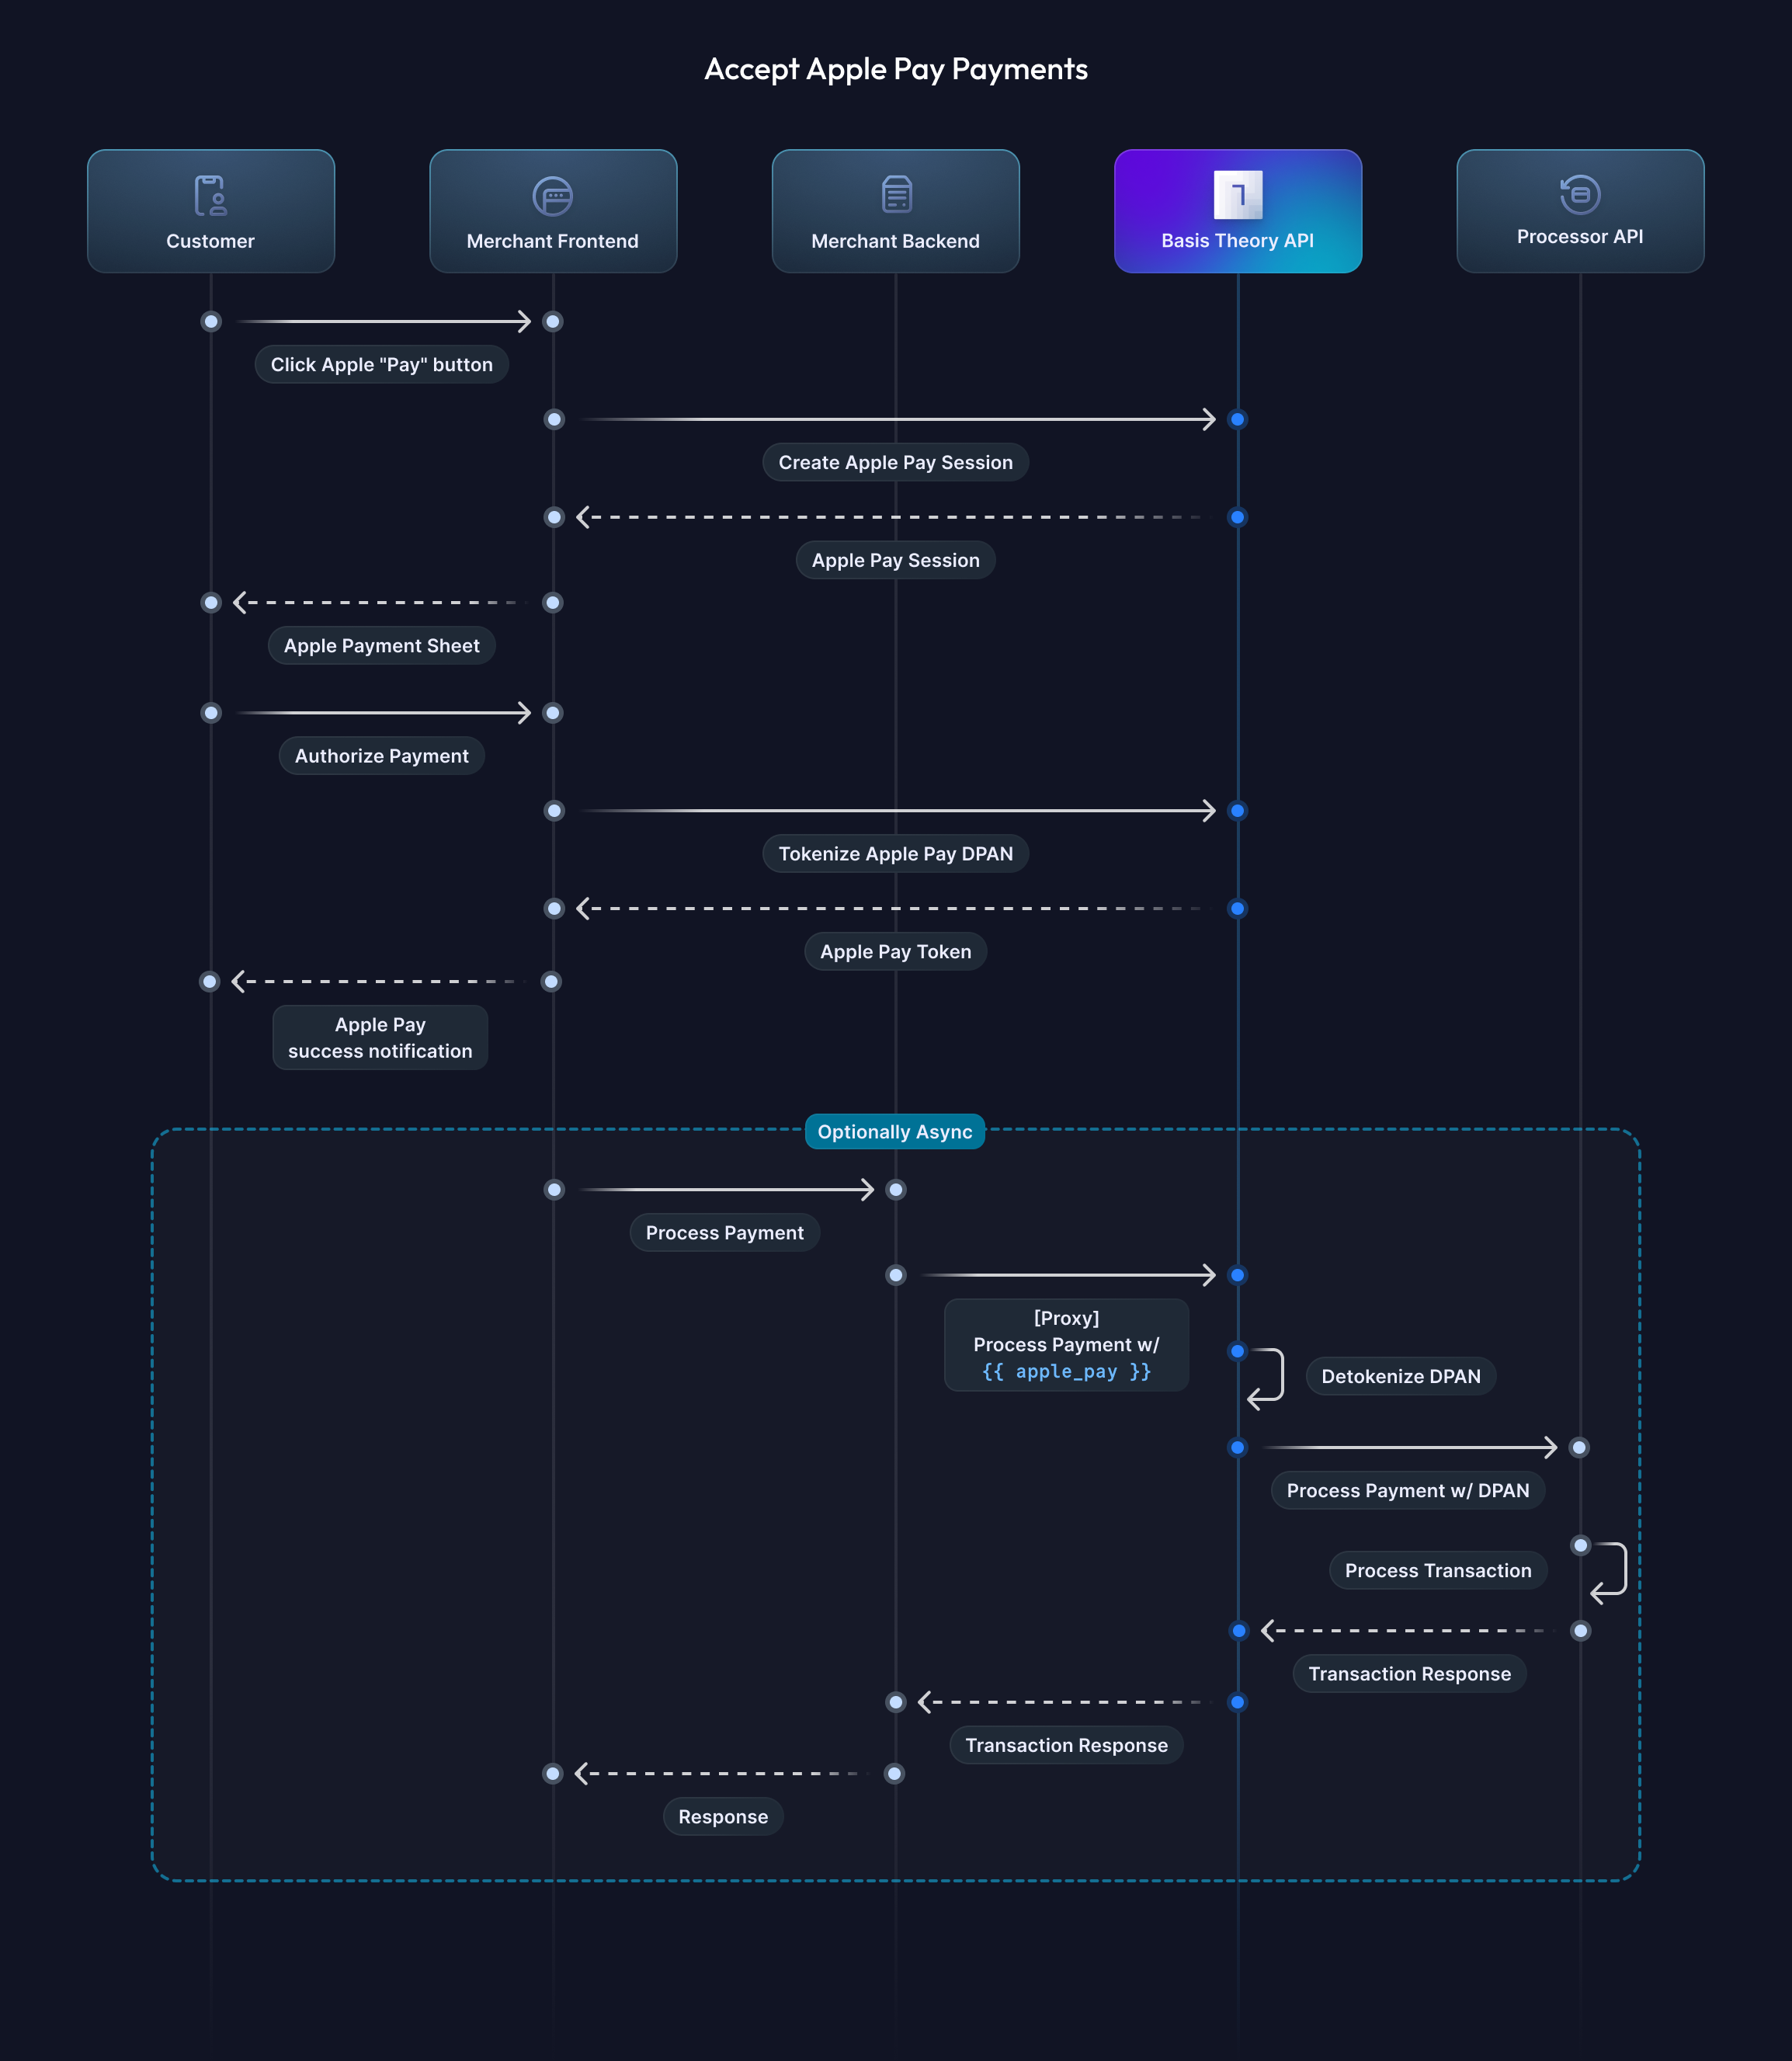
When the user clicks the Apple "Pay" button, a sequence of high-level steps is initiated:
-
Creation of an Apple Pay session - The client application calls Basis Theory to initiate an Apple Pay session.
-
Decryption of the payment data - After the user authorizes the payment, the encrypted payment data is sent to Basis Theory for decryption and storage. Basis Theory responds with an Apple Pay Token that can be used to process the payment.
-
Processing of the payment data - The Basis Theory Apple Pay Token is forwarded to the payment processor via Basis Theory Proxy, which translates Token back to raw data before sending the request. Upon receiving a successful payment response, the client application can complete the payment and inform the user that the payment was successful.
Getting Started
To get started, you will need to create a Basis Theory Account and a TEST Tenant.
Domain Verification
Domain verification is a key step in getting Apple Pay up and running on your site. It is a required step for development and production servers, to confirm that you own the domain where Apple Pay will be implemented, preventing unauthorized use and maintaining the integrity of the payment system.
- Download and serve the domain association file on your server at
https://<YOUR_DOMAIN>/.well-known/apple-developer-merchantid-domain-association. - Add the public domain to your tenant using the Customer Portal or the API
Apple requires the website to be served via HTTPS, which can be tricky during the development phase. Tunneling may represent a good option to preview local projects through a working HTTPS connection. Cloudflare tunnel may be worth checking out.
Creating an Apple Pay session
To initiate the payment modal, an Apple Pay session must be started. Basis Theory integrates with Apple to request the payment session.
Create a Public Application
You will need a Public Application for your frontend. Click here to create one using the Basis Theory Customer Portal.
This will create an application with the following Access Controls:
- Permissions:
apple-pay:session,apple-pay:create
Configure Apple Pay
Let's add the Apple Pay button and modify the session.onvalidatemerchant event handler to call Basis Theory and initiate the Apple Pay session.
<html>
<head>
    <script crossorigin src="https://applepay.cdn-apple.com/jsapi/1.latest/apple-pay-sdk.js"></script>
    <style>
      apple-pay-button {
        --apple-pay-button-width: 194px;
        --apple-pay-button-height: 64px;
        --apple-pay-button-border-radius: 13px;
        --apple-pay-button-padding: 0px 0px;
        --apple-pay-button-box-sizing: border-box;
      }
    </style>

    <script>
      function onApplePayButtonClicked() {
        if (!ApplePaySession) {
          return;
        }

        const session = new ApplePaySession(3, {
          "countryCode": "US",
          "currencyCode": "USD",
          "merchantCapabilities": [
            "supports3DS"
          ],
          "supportedNetworks": [
            "visa",
            "masterCard",
            "amex",
            "discover"
          ],
          "total": {
            "label": "Demo (Card is not charged)",
            "type": "final",
            "amount": "1.99"
          }
        });

        session.onvalidatemerchant = async event => {
          const merchantSession = await validateMerchant();
          session.completeMerchantValidation(merchantSession);
        };

        session.begin();
      }

      async function validateMerchant() {
        try {
          const response = await fetch('https://api.basistheory.com/apple-pay/session', {
            method: 'POST',
            headers: {
              'Content-Type': 'application/json',
              'BT-API-KEY': '<PUBLIC_APPLICATION_KEY>'
            },
            body: JSON.stringify({
              display_name: 'My Store',
              domain: window.location.host
            })
          });

          if (!response.ok) {
            throw new Error(`HTTP error! Status: ${response.status}`);
          }

          const data = await response.json();
          return data;
        } catch (error) {
          console.error('Error validating merchant:', error);
          throw error;
        }
      }
    </script>
</head>
<body>
  <apple-pay-button buttonstyle="black" type="plain" locale="en-US"></apple-pay-button>
  <script>
    // Set up the onclick handler for the Apple Pay button
    document.querySelector('apple-pay-button')
      .addEventListener('click', onApplePayButtonClicked);
  </script>
</body>
</html>
Adding the apple-pay-sdk.js script will enable the <apple-pay-button> directive to your website.
The validateMerchant function calls Basis Theory to initiate the Apple Pay session.
Tokenization
After the customer has authorized the payment, your application will need to call Basis Theory with the encrypted Apple Pay token.
Let's add the session.onpaymentauthorized event to call Basis Theory.
<html>
<head>
    <script crossorigin src="https://applepay.cdn-apple.com/jsapi/1.latest/apple-pay-sdk.js"></script>
    <style>
      apple-pay-button {
        --apple-pay-button-width: 194px;
        --apple-pay-button-height: 64px;
        --apple-pay-button-border-radius: 13px;
        --apple-pay-button-padding: 0px 0px;
        --apple-pay-button-box-sizing: border-box;
      }
    </style>

    <script>
      function onApplePayButtonClicked() {
        if (!ApplePaySession) {
          return;
        }

        const session = new ApplePaySession(3, {
          ...
        });

        session.onvalidatemerchant = async (event) => { ... };

        session.onpaymentauthorized = async (event, session) => {
          try {
            // decrypt and tokenize Apple Pay
            const applePayToken  = await tokenize(event);
            // present green check to the user before the timeout (30 seconds)
            session.completePayment(ApplePaySession.STATUS_SUCCESS);
          } catch (e) {
            console.error(e);
            session.completePayment(ApplePaySession.STATUS_FAILURE);
          }
        };

        session.begin();
      }

      async function validateMerchant() { ... }

      async function tokenize(event) {
        const response = await fetch('https://api.basistheory.com/apple-pay', {
          method: 'POST',
          headers: {
            'Content-Type': 'application/json',
            'BT-API-KEY': '<PUBLIC_APPLICATION_KEY>'
          },
          body: JSON.stringify({
            apple_payment_data: event.payment.token
          })
        });

        if (!response.ok) {
          throw new Error(`HTTP error! Status: ${response.status}`);
        }

        const appleToken = await response.json().apple_pay;
        console.log('apple token', appleToken);
        return appleToken;
      }
    </script>
</head>
<body>
  <apple-pay-button buttonstyle="black" type="plain" locale="en-US"></apple-pay-button>
  <script>
    // Set up the onclick handler for the Apple Pay button
    document.querySelector('apple-pay-button')
      .addEventListener('click', onApplePayButtonClicked);
  </script>
</body>
</html>
Processing the Payment
We'll send the Basis Theory Apple Pay Token to a Payments Service Provider (PSP) to test charging a card. We'll be doing this from our backend by using a Proxy and a Private Application.
Create a Private Application
You will need a Private Application to allow your backend to call Basis Theory APIs. Click here to create one using the Basis Theory Customer Portal.
This will create an application with the following Access Controls:
- Permissions:
proxy:invoke
Charge the Payment
Payment service providers (PSPs) may differ in how they handle this operation, offering workflows like "authorization and capture" or "direct charge."
We'll change our frontend application one last time to pass in the Token ID to the backend to process the payment.
<html>
<head>
    <script crossorigin src="https://applepay.cdn-apple.com/jsapi/1.latest/apple-pay-sdk.js"></script>
    <style>
      apple-pay-button {
        --apple-pay-button-width: 194px;
        --apple-pay-button-height: 64px;
        --apple-pay-button-border-radius: 13px;
        --apple-pay-button-padding: 0px 0px;
        --apple-pay-button-box-sizing: border-box;
      }
    </style>

    <script>
      function onApplePayButtonClicked() {
        if (!ApplePaySession) {
          return;
        }

        const session = new ApplePaySession(3, {
          ...
        });

        session.onvalidatemerchant = async (event) => { ... };

        session.onpaymentauthorized = async (event, session) => {
          try {
            // decrypt and tokenize Apple Pay
            const applePayToken = await tokenize(event);
            // present green check to the user before the timeout (30 seconds)
            session.completePayment(ApplePaySession.STATUS_SUCCESS);
            // send the token to the backend for payment processing
            const response = await chargePayment(applePayToken.id);
            console.log(response);
          } catch (e) {
            console.error(e);
            session.completePayment(ApplePaySession.STATUS_FAILURE);
          }
        };

        session.begin();
      }

      async function validateMerchant() { ... }

      async function tokenize(event) { ... }

      async function chargePayment(applePayTokenId) {
        return fetch('http://localhost:3000/charge-payment', {
          method: 'POST',
          headers: {
            'Content-Type': 'application/json',
          },
          body: JSON.stringify({
            applePayId: applePayTokenId
          })
        });
      }
    </script>
</head>
<body>
  <apple-pay-button buttonstyle="black" type="plain" locale="en-US"></apple-pay-button>
  <script>
    // Set up the onclick handler for the Apple Pay button
    document.querySelector('apple-pay-button')
      .addEventListener('click', onApplePayButtonClicked);
  </script>
</body>
</html>
We'll set up and invoke the ephemeral Proxy on our backend.
- Checkout
- Stripe
curl 'https://api.basistheory.com/proxy' \
 -X 'POST' \
 -H 'Content-Type: application/json' \
 -H 'BT-API-KEY: <PRIVATE_API_KEY>' \
 -H 'BT-PROXY-URL: https://api.sandbox.checkout.com/payments' \
 -H 'Authorization: Bearer <CHECKOUT_AUTH_TOKEN>' \
 -d '{
   "source": {
     "type": "network_token",
     "token_type": "applepay",
     "token": "{{ apple_pay: <APPLE_PAY_TOKEN_ID> | json: \"$.data.number\" }}",
     "expiry_month": "{{ apple_pay: <APPLE_PAY_TOKEN_ID> | json: \"$.data\" | card_exp: \"MM\" }}",
     "expiry_year": "{{ apple_pay: <APPLE_PAY_TOKEN_ID> | json: \"$.data\" | card_exp: \"YYYY\" }}",
     "eci": "{{ apple_pay: <APPLE_PAY_TOKEN_ID> | json: \"$.authentication.eci_indicator\" }}",
     "cryptogram": "{{ apple_pay: <APPLE_PAY_TOKEN_ID> | json: \"$.authentication.threeds_cryptogram\" }}"
   },
   "amount": 1000,
   "currency": "USD",
   "processing_channel_id": "<CHECKOUT_PROCESSING_CHANNEL_ID>"
 }'
You may need to ask Stripe to enable accepting decrypted Apple Pay in your account.
Please note that Stripe does not recognize network token parameters on creation of a payment method.
curl 'https://api.basistheory.com/proxy'
-H 'BT-API-KEY: <PRIVATE_API_KEY>' \
-H 'BT-PROXY-URL: https://api.stripe.com/v1/payment_intents' \
-H 'Authorization: Bearer <STRIPE_AUTH_TOKEN>' \
-d amount=1000 \
-d currency=usd \
-d "payment_method_types[]"=card \
-d confirm=true \
-d "payment_method_data[type]"=card \
-d "payment_method_data[card][network_token][tokenization_method]"=apple_pay \
-d "payment_method_data[card][exp_month]"={{ apple_pay: <APPLE_PAY_TOKEN_ID> | json: \"$.data\" | card_exp: \"MM\" }} \
-d "payment_method_data[card][exp_year]"={{ apple_pay: <APPLE_PAY_TOKEN_ID> | json: \"$.data\" | card_exp: \"YYYY\" }} \
-d "payment_method_data[card][last4]"={{apple_pay: <APPLE_PAY_TOKEN_ID> | json: '$.data.number' | last4 }} \
-d "payment_method_data[card][network_token][number]"={{ apple_pay: <APPLE_PAY_TOKEN_ID> | json: \"$.data.number\" }} \
-d "payment_method_data[card][network_token][exp_month]"={{ apple_pay: <APPLE_PAY_TOKEN_ID> | json: \"$.data\" | card_exp: \"MM\" }} \
-d "payment_method_data[card][network_token][exp_year]"={{ apple_pay: <APPLE_PAY_TOKEN_ID> | json: \"$.data\" | card_exp: \"YYYY\" }} \
-d "payment_method_options[card][network_token][cryptogram]"={{ apple_pay: <APPLE_PAY_TOKEN_ID> | json: \"$.authentication.threeds_cryptogram\" }} \
-d "payment_method_options[card][network_token][electronic_commerce_indicator]"={{apple_pay: <APPLE_PAY_TOKEN_ID> | json: \"$.authentication.eci_indicator\" | pad_left: 2, \"0\" }}
Testing
Basis Theory does not support Apple’s sandbox environment, requiring the use of an actual card from your Apple Wallet for testing purposes. When operating within a Test tenant, Basis Theory will not return real card data. Although the Apple Pay token generated during development is authentic, the associated Basis Theory Apple Pay token will contain simulated data only.
To access genuine, valid network tokens derived from Apple Pay tokens, a Production tenant must be utilized.
Preparing for Production
This checklist will guide you through the critical steps you need to follow before moving your Apple Pay integration into production. Ensuring that everything is properly set up and tested reduces the likelihood of errors during live transactions and offers a seamless payment experience to your customers.
Test in Production with a Live Wallet and Card
- Before going live, perform test transactions using a Live Apple Pay wallet with a personal or corporate card added. This step ensures that everything is functioning correctly in the production environment with real-world payment methods.
- Keep in mind that Apple Pay in production does not behave the same as in testing, so using live payment information is critical.
Handling Transaction Failures
When a transaction fails, here’s what you should do:
- Check the Error Code: Look for any error codes returned as part of the failed transaction response. These error codes typically point to the cause of the failure.
- Contact Your Payment Processor: If the error code is unclear, reach out to your Payment Processor to diagnose the issue. As processors handle the transaction flow, they often have the most accurate and actionable information about why a transaction may have failed.
- Seek Assistance from Basis Theory (if applicable): If your integration leverages Basis Theory and you’re unable to resolve the issue with your processor, Basis Theory support can assist in identifying potential issues. However, the Processor will usually have the best resources and tools to help address errors swiftly.
Determine Where to Send Apple Pay Token Payloads
Apple Pay generates a secure token payload for each transaction. It’s essential to configure your integration properly to ensure these tokens are correctly routed. Follow these steps:
- Review Processor Documentation: check the integration and setup documentation provided by your Payment Processor (PSP). They often provide detailed instructions on how and where to send Apple Pay token payloads.
- Enable Apple Pay Support with Your PSP: some payment processors require you to explicitly enable Apple Pay within their systems. Reach out to your PSP to ensure Apple Pay functionality is activated for your account.
- Understand How to Send Tokens: each PSP handles Apple Pay tokens differently, so it is critical to verify where the token payloads should be sent, and confirm the API endpoints, required headers, and payload formats specific to your PSP.
- Contact PSP for Guidance: if the documentation is unclear, reach out to your PSP’s support team to clarify the process for enabling Apple Pay support, and the steps to correctly transmit the token payload for processing.
Final Notes
- Keep logs of your test transactions in production for future reference.
- Double-check all API keys, certificates, and environment configurations to avoid common production issues.
- If you encounter additional issues or have questions specific to Basis Theory functionality, don’t hesitate to contact Basis Theory’s support team for further assistance.
By following this checklist, you’ll be prepared to seamlessly integrate and go live with Apple Pay, providing a secure and smooth payment experience for your users.
FAQs
My Stripe PaymentIntent and SetupIntent fail when using ApplePay.
For PaymentIntents, The currency for the ApplePay Session and the currency set in the PaymentIntent must match or Stripe will decline the transaction.
For SetupIntents, The currency for the ApplePay Session must match the defualt currency of your account - SetupIntents do not allow currency to be overridden.